 The last several months some volunteer home bakers from all over the map have been busily making, tasting, and rating sample cookie recipes I’m creating for a new cookbook called Simply Sensational Cookies. I arranged for them to test because it’s valuable, maybe even crucial to get a sense of how potential customers react to what might be going in my book. Notice the word might—testers actually help determine which recipes make the grade and which get cut!
In case you’re wondering, yes, soliciting brutally honest feedback from random testers can be hard on the ego (nobody enjoys criticism). But it’s a great way to determine what recipes are “good enough” for publication. (A previous post on when recipes are “good enough” is here.) Home testers help ensure that my work meets readers’ expectations and, ultimately, that buyers are pleased with their purchase. I’d rather learn privately that a recipe was a dud (when I can do something about it), than read this in a nasty on-line reader review! (I’m not encouraging snide, snarky reviews, mind you; authors do have feeling, too!)
As usual, I instructed testers to grade very hard and to point out any problems with both the written recipe and the end results. They were asked to rank taste, texture, appearance and overall appeal of the cookie they made. Even more important questions: Would they make the recipe again and was it worth the trouble? No’s to either of these last two and a recipe automatically flunked.
Here are the kinds of recipes sent out to testers and why: Some included a tricky, unusual, or complicated step, and I wanted to verify that a typical enthusiastic home cook could successfully make them. Some seemed easy to me and my assistants, but I want to know if a home baker will consider them “easy,” too. Some had gotten mixed ratings from tasters during development, so I wanted another completely independent assessment.
Most of the recipes I sent out received good, or great grades, but—ouch—a couple did flunk! I was mortified but also grateful for the truth. A full run-down (with pics) of what testers liked and disliked is here.
What happens when a recipe fails? It depends on what the tester had to say. Sallie, the tester of the peanut crisps recipe, wrote: “The texture and appearance I felt was good. The color and crispness appealed to me. The flavor was just not there. “ She rated the taste a 3 out of 10—yikes!
But because Sallie saw some promise in the recipe—nice texture and looks—I decided to give this one another chance. Originally I’d wanted to keep the crisps low in fat for healthful snacking, but to banish the blands, during revamping I more than doubled the amount of peanut butter and also increased the peanuts, sugar, and salt. (Which just shows how hard creating tasty low-fat treats is!)
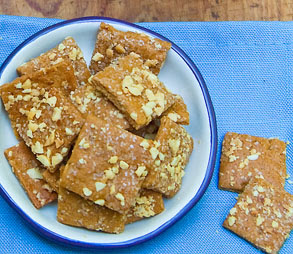
Here’s the totally reworked recipe, which is now passing taste tests with flying colors! The texture is as outstanding as in the beginning, the flavor has been cranked up so these are very hard to resist. So, yes, it’s going in the book. I think you can now see just how valuable tester feedback can be.
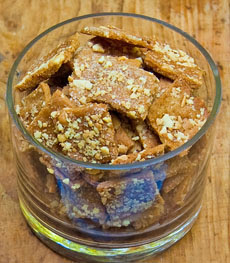
These crisps are really a cross between cookies and crackers and are great for snacking. Though slightly sweet, they are thin and rectangular like crackers, and, due to slow toasting in the oven and coarse sugar garnish on top, they are crunchy crisp. The peanuts, peanut butter, and oil all contribute fat, but it’s mostly the monounsaturated, cholesterol-lowering kind, plus peanuts are a good, economical source of protein. And the crisps also contain some whole wheat flour, a markedly better source of fiber and nutrients than white flour.
1 1/3 cups unbleached all-purpose white flour, plus more if needed
2/3 cup whole wheat flour
6 1/2 tablespoons packed light brown sugar
1 teaspoon baking powder
1/2 teaspoon salt
1/4 cup peanut oil or other flavorless low-saturated fat vegetable oil
3/4 cup smooth or chunky peanut butter
2 tablespoons molasses
1 cup finely chopped, roasted, salted peanuts for garnish
About 1/4 cup turbinado sugar or other plain coarse crystal sugar for garnish
Baking Preliminaries: Position a rack in the middle of the oven; preheat to 350 degrees F. Set out two large baking sheets and 4 long sheets of baking parchment. Also line a very large rimmed pan with baking parchment.
In a large bowl stir together the white and whole wheat flours, the brown sugar, baking powder, and salt until well blended; mash out any sugar lumps with the back of the spoon. Whisk together the oil, peanut butter, molasses, and a generous 1/2 cup warm water until very well blended. Immediately stir the mixture into the flour mixture until evenly incorporated. If the dough is dry, stir in enough more water until the mixture holds together when pinched between fingertips.
Divide the dough in half. Roll out each portion between sheets of baking parchment into a (thin) 12-inch square. If necessary, cut and patch it to make the sides fairly even. Peel off the top sheets of parchment. Sprinkle each dough layer evenly with a quarter of the coarse sugar and a quarter of the peanuts. Lay the parchment over the dough, then roll the pin back and forth to imbed the sugar and the peanuts. Turn over the dough, peel off the top sheets and repeat the garnishing and rolling with the pin on the second sides. Remove the top sheets of parchment.
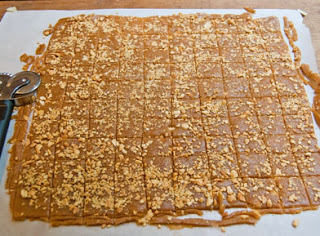
Using a pizza cutter, pastry wheel, or a large knife, cut each sheet of dough lengthwise and crosswise into 10 equal strips to form a grid of squares.One at a time, slide the paper and dough (leaving the scraps in place) onto the baking sheet.
Bake (middle rack) one pan at a time for 13 to 15 minutes or until the dough sheets are set and browning at the edges, but still not firm in the center. Let cool. Reset the oven to 225 degrees F.
When the crisps are cool enough to handle, remove and discard the edges and scraps (or nibble on them!). Separate the squares with your hands and spread them on the rimmed parchment-lined pan. Toast (middle rack) for 20 to 25 minutes (the longer, the crisper); gently stir to redistribute the crisps about halfway through. Turn off the oven; let the crisps stand at least 30 minutes and up to an hour or more to toast them further. Then remove them from the oven and let stand until completely cooled. Pack airtight.
Yield: Makes about 100 1 1/2-inch crisps.
Storage: Store these airtight at room temperature for up to 2 weeks; or freeze airtight, for up to 2 months.
Two related posts you might like:
“You Did WHAT to My Recipe?–Sad Tales from the Food Writer Files“


I really like the idea of a cross between a cookie and cracker, and the whole wheat flour in these sounds great. Sounds like these would definitely be addictive!
It would be great if you want to give the recipe a try. You can find the rating sheet at the following place:
Thanks!
http://www.kitchenlane.com/2008/09/testing.html
How fun! I'll make these next week and let you know. Would love to use the rating sheet.
Looks fun Nancy. I just hurt my foot so I won't be baking for a few days.