Since Jim Lahey’s crusty white pot bread was published back in 2006, thousands of home baker’s have tried their hand baking this simple, but spectacularly good bread. I liked his version, but wanted to come up with a larger loaf and one that had even more flavor. And I wanted to completely eliminate the hand-shaping and all the kitchen counter mess.
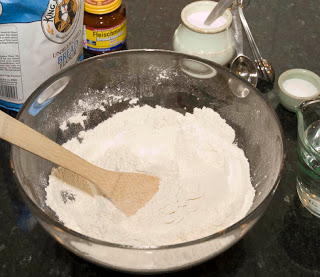
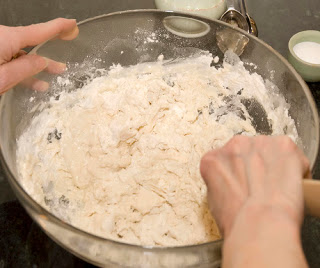
That’s what I did with the recipe below. It’s in my new bread cookbook, Kneadlessly Simple. The very basic ingredients–just flour and a little yeast, salt, and sugar are mixed together in a large bowl. Then ice cold water is stirred in. Yes, ice cold! (Be sure you use fast-rising, instant, or bread machine yeast with the cold water though.) It won’t hurt the yeast and it improves the flavor and texture of the finished bread. As you can see, the dough is moist, but not wet like batter bread. It should hold some shape and be hard to stir.
Next, the dough is covered and just sits and kneads itself. For convenience and the absolute best flavor, it can be refrigerated for a while. This is entirely optional. Then it goes on the countertop for a slow, cool rise of about 18 to 24 hours. A little more or less won’t hurt.
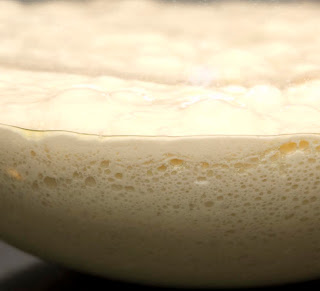
It’s the natural bubbling action, caused by the yeast fermentation, that actually kneads the dough. The bubbles actually move the dough, bringing together the two proteins that form gluten on the molecular level in much the same way as the pulling and pushing of traditional kneading brings them together in a more obvious way. The long, slow rise also allows plenty of time for the dough to develop a rich aroma and complex flavor that can’t be achieved with a hurried rise.
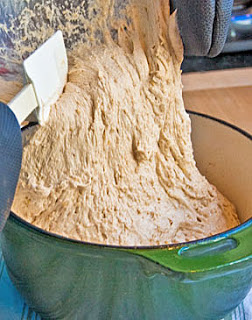
The next step is simply to fold the dough into its center until partially deflated, and after it rises again, invert it directly into a preheated 3 1/2 to 4-quart Dutch oven to bake. Absolutely no shaping of the loaf or other fiddling is required. The surface smooths out and the dough browns and forms a lovely boule on its own.
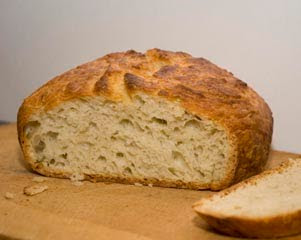
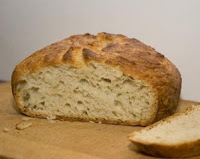
And finally there’s the bread, still warm from the oven and boasting a beautiful, crusty top and creamy-soft interior.
Pot boules — round, peasant-style breads that are simply popped into a sturdy, lidded pot and baked — are about the easiest loaves possible, but among the most gratifying. They puff up well, brown beautifully and always come out crusty, due to the moisture trapped inside the pot during the first few minutes in the oven. (In fact, the pot actually serves as a minioven.) Still, if you don’t have a pot, here’s a popular crusty cheese bread that just uses a loaf pan.
For another pot bread, my crusty seeded pale ale pot boule, go here. For one very economical pot I like a lot, go here; or lots of useful info on various kinds of pots to use, click here .
Like the basic black dress, this basic white loaf is always appropriate and in favor. The interplay of light mild crumb, crunchy golden crust and deep, sweet yeast taste and aroma (coaxed out by long, slow rising) is downright amazing. In fact, eating this bread is a far more complex and exciting sensory experience than one might expect from the simple ingredients.
If you’d like to listen to an interview of me and an NPR commentator making this bread in my kitchen click here .
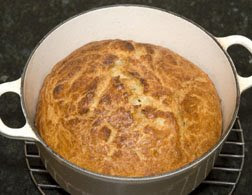
Tip: A cast iron Dutch oven makes a good baking pot. The bread usually doesn’t stick to seasoned plain or enameled cast iron, but if you aren’t sure about your pot, spritz the interior with a little nonstick spray immediately before you turn out the dough into it.
Makes 1 large loaf, 12 to 14 slices.
4 cups (20 ounces) unbleached all-purpose white flour or white bread flour, plus more as needed
1 teaspoon granulated sugar
2 teaspoons table salt
3/4 teaspoon instant, fast-rising or bread-machine yeast
2 cups ice water, plus more if needed
Corn oil, canola oil or other flavorless vegetable oil or oil spray for coating dough
First Rise: In a large bowl, thoroughly stir together the flour, sugar, salt and yeast. Vigorously stir the water into the bowl, scraping down the sides and mixing until the ingredients are thoroughly blended. If the mixture is too dry to incorporate all the flour, stir in more water, a bit at a time, just enough to blend the ingredients. Don’t over-moisten; the dough should be very stiff. If necessary, stir in enough more flour to yield a hard-to-stir dough. Brush or spray the top with oil. Cover the bowl with plastic wrap. If desired, for best flavor or for convenience, you can refrigerate the dough for three to 10 hours. Then let rise at cool room temperature for 18 to 24 hours. If convenient, vigorously stir the dough once about halfway through the rise.
Second Rise: Using an oiled rubber spatula, gently lift and fold the dough in toward the center, all the way around, until mostly deflated; don’t stir. Brush or spray the surface with oil. Re-cover the bowl with plastic wrap that has been coated with nonstick spray. Let rise using any of these methods: for a 1 1/2- to 2 1/2-hour regular rise, let stand at warm room temperature; for a 1- to 2-hour accelerated rise, let stand in a turned-off microwave along with 1 cup of boiling-hot water; or for an extended rise, refrigerate, covered, for 4 to 24 hours, then set out at room temperature. Continue the rise until the dough doubles from the deflated size; remove the plastic if the dough nears it.
Baking Preliminaries: 20 minutes before baking time, put a rack in the lower third of the oven; preheat to 450 degrees. Heat a 3 1/2- to 4-quart (or larger) heavy metal pot or Dutch oven in the oven until sizzling hot (test with a few drops of water), then remove it, using heavy mitts. Taking care not to deflate the dough (or burn yourself), loosen it from the bowl sides with an oiled rubber spatula and gently invert it into the pot. Don’t worry if it’s lopsided and ragged-looking; it will even out during baking. Generously spritz or brush the top with water. Immediately top with the lid. Shake the pot back and forth to center the dough.
Baking: Bake on the lower rack for 55 minutes. Remove the lid. Reduce the heat to 425 degrees. Bake for 15 to 20 minutes longer, or until the top is well browned and a skewer inserted in the thickest part comes out with just a few crumbs on the tip (or until center registers 209 to 212 degrees on an instant-read thermometer). When it seems done, bake 5 minutes longer to ensure the center is baked through. Cool in the pan on a wire rack for 10 to 15 minutes. Remove the loaf to the rack and cool thoroughly.
Serving And Storing: Cut or tear the loaf into portions; it tastes good warm but will cut much better when cool. Cool completely before storing. To maintain the crisp crust, store draped with a clean tea towel or in a heavy paper bag. Or store airtight in a plastic bag or wrapped in foil: The crust will soften, but can be crisped by heating the loaf, uncovered, in a 400 degree oven for a few minutes. The bread will keep at room temperature for three days, and may be frozen, airtight, for up to two months.
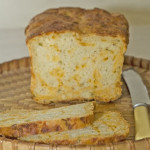
VARIATION: Crusty Rosemary And Olive Pot Bread — Stir 1 cup pitted, coarsely chopped kalamata olives (well drained) and 3 tablespoons finely chopped fresh (not dried) rosemary needles (discard the stems) into the dough along with the water. Proceed exactly as directed. The loaf is shown below.
Another great no-knead bread–Cheddar & Green Chiles Bread is here.
Nancy Baggett says
Hi,
I would have no real idea how to help you with your grandmother’s bread recipe. If you add raisins be sure they are not dried out–they will try to rehydrate, drawing moisture that the yeast needs to thrive. As for the dark seeds, poppy seeds are dark blue-black and very tiny. They do have a faint anise taste. I know they are popular in Austrian pastries, but not sure about Polish. You didn’t say whether the bread was sweet or what the texture was like. This bread isn’t sweet and the texture is crusty-springy sort of like French bread. Good luck on your hunt!
Sue says
My husband’s Polish grandmother used to make a bread that looks similar to this one but no one ever got her exact recipe before she died. We tried but her recipes were always a handful of this or a pinch of that or a coffee cup of some dry ingredient but coffee cups come in all different sizes. The batter had golden raisins and some type of very tasty black seed with possibly a licorice flavor. It’s been a long time since I’ve had it so am not sure about the licorice flavor. It may or may not have had some type of cheese in the batter also but again, I’m not sure of that either I believe she also put cottage cheese on top. Do you perhaps have a recipe that fits what I describe. Hers were always round and puffy. I do know she used yeast. Thank you for any help you can provide….. Sue
Nancy Baggett says
I would try lowering the temp 25 degrees F at each stage mentioned–from that you should be able to tell whether you need to increase, lower, or stay the same for further batches. To be save, you should follow whatever the cloche directions say re preheating.
I would love to hear how the recipe comes out using the cloche, btw.
Sam Titone says
Just bought Kneadlessly Simple and an oblong La Cloche Baker. I would like to bake your Pain Ordinaire in the La Cloche. How should I adjust the temperature and time to bake properly in the La Cloche. This would be good information to convert any recipe to the La Cloche.
Thanks,
Sam
Nancy Baggett says
As to how to ready ice water: This is covered thoroughly in the book, but not in the recipes taken from it. Simply fill a large measure with ice cubes, then add cold tap water and stir for about 30-40 seconds. Then pour the ice cold water out (leave the cubes behind) into the cup you're measuring it into and mix in as directed.
Don't worry if your water was not really cold enough–the dough will just not be quite as flavorful and may rise faster than the recipe indicates.
Anonymous says
I have just started my first no-knead bread and set it in the fridge before the first rise.I have a very basic question. I have been reading comments on this blog and looking at recipes on the Internet and I haven't seen anywhere. My question. How do you get ice water? My well water is very cold and that is what I used. Does the water have to be colder than that?
Nancy Baggett says
Hey Zona, great to hear from you. I think of you often, too. I heard from someone that you'd sold the school a while back. Do you ever get to IACP?
Glad you like my approach to no-knead. Not everybody goes for it, but the book does have a pretty avid following and it has done (and still is) doing very well.
Zona Spray Starks says
What a joy to see your blog. Your still writing as wonderfully as ever and enriching other people's lives.
Love your twists on the no-knead concept.
Think of you often,
Zona
Nancy Baggett says
Actually, stirring halfway through these long rises won't slow the total rise down at all. It just helps ensure that all the flour particles and yeast are evenly hydrated, making the environment even more favorable for the yeast to grow well. The friction of stirring also warms the dough just slightly, which also encourages more rapid yeast growth.
Nancycs says
Another question while I am thinking of it….you say stir halfway through first rise time if convenient. What will this do? Will it then take longer to get to the rise stage to get ready for the second rise? Thanks!
Nancycs says
I am just wondering how I know if my dough is ready to prep for the second rise? You said in your book that some of the recipes will triple or quadruple. Will some just double? My pot bread has been going for 16 hours now and I am not sure if it has even quite doubled (maybe it has). I only have 2 hours for the minimum and I don't see it raising that much. My temp overnight was about 64* but since 7 it has been about 75*. I am sure I won't hear before this loaf is done but it will be nice to know for future loaves! Thanks!
Jill Brock says
My mother bought your book for me a couple of years ago. It has changed our lives! Money is very tight and being able to make bread daily saves us a ton. We also eat much tastier bread than we used to. I have yet to try one of your recipes that isn't perfectly wonderful. Thank you so much.
Nancy Baggett says
Alex, you can certainly halve the recipe, but you won't halve the baking time–remember the dough is divided in half to bake the original loaves, so the time will be similar. (But the only real way to know with any new baking pan, is just to try it and see.) Some doughs are not stirred after the first rise simply because we're going for a bread with more openness and holes. Stirring removes them to a great extent–though this won't hurt the flavor at all.
Anonymous says
Hi Nancy
I've made the easy oat bread several times and I love it! I have always wanted to try to recipe but the largest dutch oven I have is a staub 2.25qt / 20cm. If I halve the recipe, does it mean I can halve the baking time?
Also why shouldnt we stir the dough after the first rise? In the easy oat bread recipe you suggest stirring vigorously after the first rise. Why is it different in the recipe?
Cant wait to try more of your recipes!
Thanks,
Alex
Nancy Baggett says
I employed someone to test one of the recipes at high altitude, but not this one. It is indeed tricky to make adjustments for it. I suggest that you reduce the amount of yeast by 1/3 or more. Also, be aware that the dough will likely rise faster and higher. Though I usually caution against underrising, in this case, it might be best to err on the side of underrising just a smidge. Do let me know how things work out. Good luck.
Amy says
Nancy,
Your bread looks delicious and I can't wait to try it. Do you have any suggestions regarding changes I should make to the recipe since I live at a high altitude? I live south of Denver at about 7,000 ft. I have had so many disasters with baking at this altitude, so I thought I'd ask you before trying this bread. Thanks-Amy
Nancy Baggett says
Katherine, it's always tricky to guess what will happen, but I think you should reduce the temp a bit–maybe to 400 or even 375 degree F. Also, I suspect the cheese may cause the dough to stick to the pot–so just before you dump the dough into it, spritz it with some non-stick spray. As far as baking time, you'll just have to check–this will depend partly on the pot. Good luck!
Katherine says
Hi,
I'm loving the pot bread recipes in your book and would like to try the chiles and cheddar bread using the pot technique. Are there any adjustments I should consider before starting?
Katherine says
Hi,
I'm loving the pot bread recipes in your book, and would like to try your chiles and cheddar recipe using the pot baking technique. Are there any adjustments I should consider?
Nancy Baggett says
Yes, it's certainly true these recipes take time–both for the self-kneading to occur and the wonderful flavor to develop. But the actual work is minimal and the doughs can be left mostly unattended. It can work well to make up a dough in the early evening (even on a week night); refrigerate till bedtime; then allowed to rise from then through the next day. Finally, upon returning home from work, the dough can be given its second rise and baked. Thanks for commenting.
Catherine A. McClarey says
I tried this during the Midwest blizzard this week, since I had a day off from work. My whole family enjoyed the bread, and it had a fantastic crust — but it is a much longer process to make than the bread-machine recipes I'm used to. Not necessarily a bad thing, mind (I like homemade bread any way I can make it); however, for now, no-knead bread is probably going to be a weekends-only thing for me.
(BTW, I just started a batch of the Granola Breakfast Bread recipe you have posted on Amazon.com over the lunch hour today; I'm hoping to serve it with tomorrow's supper.)
Nancy Baggett says
You can certainly use your starter in the recipes. I would use about 1/2 cup to 2/3 cup of starter (larger amount for very large loaves)and then just stir in enough ice water to yield the amount of ice water called for in the recipes, plus maybe 3 or 4 extra tablespoons of water to compensate for the flour in the starter. You could reduce the commercial yeast called for by a quarter or third, but I wouldn't eliminate it from my recipes completely. Good luck!
Robaire says
Nancy – I would like to use my sourdough starter in your no-knead bread recipe. How much should I use? And are there any other modifications I should make? Thanks.
Nancy Baggett says
Laura, it is a good idea to brush or spray the top with a little more oil if you stir the dough halfway through the rise, but it isn't essential. The oil is just a little extra insurance against the top drying out.
Anonymous says
Nancy,
If I stir the dough halfway through the first rise, should I respray the top with oil?
Thanks,
Laura
Nancy Baggett says
I hope you have luck with the GF flour–I am not sure this recipe will really work, as most yeast breads need the gluten to trap the gas released by the yeast.
I Am Gluten Free says
I can't wait to try my hand at making this with gluten free flour! Thanks for the inspiration.
Nancy Baggett says
I haven't done a bread calling for cottage cheese in many years! I've found that adding plain yogurt tastes better and it doesn't need to be smoothed out first. I'm not sure what recipe you're referring to–perhaps one from an old book of mine that's now out of print. Anyway, it's old enough that it isn't in my current data base. You will find a good substitute for the old recipe in Kneadlessly Simple–it's called Farmhouse Potato Bread with Dill and Chives.
Anne says
Yesterday I happenend onto one of your bread recipes containing onion powder-garlic powder-dill-cottage cheese and of course the usual other ingredients.
Could you email me the recipe while I await your book?
rosplock@yancey.main.nc.us
Thank You
Nancy Baggett says
Sorry I didn't see that you had posted your question until now. The olives and rosemary will make the dough a little moister, but not a lot. Yes, you can always add a little more flour before the second rise–no harm will be done.
Yes, I meant fold the dough in towards the center. Hopoe this helps in the future.
Chantal says
Hi,
I'm actually in the process of making your crusty white pot bread with the olives and rosemary variation and I had two questions:
in your experience, do the olives tend to make the dough moister and should I add a little bit of flour (maybe sifted?) before the second rise?
Second, you call for folding the dough edges towards its center until the dough is deflated (no stirring) – you mean center of the dough right?
Thanks for getting back to me, and thank you for your wonderful book!
Nancy Baggett says
Thanks so much for the compliment. I am delighted that you are pleased with the recipes. Come back and post any time. Happy Baking!
Susan says
You are the queen of no-knead bread! I bought Kneadlessly Simple one week ago and have already made 3 of your delicious recipes. I am your biggest fan and can’t wait to try more of your delicious recipes.