• Skip to primary navigation
  • Skip to main content
  • Skip to primary sidebar
  • Skip to secondary sidebar

KitchenLane

Original, well-tested recipes, enticing photos, and helpful cookbook writing how-tos

  • Home
  • meet nancy
  • Blog
  • news and events
  • The Art of Cooking with Lavender
  • articles
  • recipe archives
  • cookbooks
  • reviews
  • Newsletter
  • videos
  • contact
  • New Lavender Cookbook
  • Connecticut Attorney’s Polish Client Snatched from His Car

Introducing a Fine New “Kneadless” Bread Pot & a Crusty Wheat Pot Boule to Bake in It

February 17, 2012 By Nancy Baggett 13 Comments

I was wrong—well partly wrong! And I’m happy to say so, because it involves sharing some pleasant news.

Until recently, I always told folks that the best pots for baking the  new “kneadless”  rustic boules were  various metal containers in the 3- to 3 ½-quart range.  Even though I’d successfully used a vintage white Corningware baker and one hand-crafted stoneware casserole while testing my recipes, I specifically avoided recommending ceramic containers.  I was leery about the risks of preheating any empty ceramic pot to 450 degrees  F, then dumping  in a cool or room temperature yeast dough.  It seemed like this step was just inviting the container to crack or shatter from thermal shock.
While my concerns were justified (some ceramic containers can’t tolerate such treatment), others, like the beautiful stoneware piece shown here will handle it just fine.  In fact, as this pot’s makers Tom and Betsy of Clay Coyote explained, it was custom-created just for baking rustic, crusty pot boules like the one here.


Says Betsy, “We were first introduced to no knead bread about three years ago by a good customer.  She was hunting for one of our casseroles to make the bread, but found that most of ours are curved on the inside, which makes it pretty tough to get the bread out in the end.  We loved the bread so much we decided to make a baking dish just for it.” I was, of course, thrilled when Betsy added that she and Tom also carry Kneadlessly Simple in their gallery as a “featured book to go with the baking dish.”  (Disclosure: I have no commercial relationship with Clay Coyote and played no role in their decision to sell my book, but they did send me the pot free of charge.)


As you can probably tell, the pot is not only handsome, but is well suited for baking “kneadless” pot boules. It’s about 8-inches in diameter inside, straight-sided, and features a roomy domed lid, all ideal for effortlessly creating a perfectly round, high-rising loaf (and getting it out once it’s done!).  The size and shape are exactly what I recommended in my book and blog post on choosing suitable bread pots here; some recipes circulating around the Web suggest a larger dish, but this lets the dough spread out too much and yields a flatter, less stylish- looking loaf.
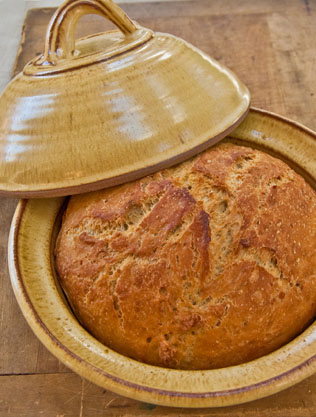
Clay Coyote Stoneware Pot & “Kneadkess” Boule
I was curious as to why the Clay Coyote pot can withstand high temperatures when some stoneware pieces can’t, so asked Tom about this.  Basically, he says, the key is in using the right clay—it must be formulated for heat tolerance: “Stoneware expands from heat when some of the silica in the clay body is left in a crystalline state and these crystals expand when heated,” he explains.  “One type of crystals in some clay is called cristabolite and it can suddenly expand  about 3 percent when it reaches 428 degrees F.  This sudden expansion can mean trouble—the pot may crack.” To avoid such problems Tom says they use clays in which these crystals are actually dissolved, which eliminates the cristoabalite and the related expansion problems.
Still, he cautions, it’s a good idea to heat the Clay Coyote stoneware pot gradually, at the same time the oven is heated. And, he says, place the hot bowl on a soft surface like a towel or hot pad when it’s taken out of the oven. “If there ever is a cracking problem–rare but possible—we replace without question,” he notes.  Since my recipes feature the unique step of simply turning the unshaped dough mass right into the preheated pot (other books require you to shape it into a loaf first), I also suggest that the dough be at warm room temperature when put in to reduce the thermal shock.


Aside from the obvious aesthetic appeal of baking homemade bread in a hand-crafted pot, I found it produces a loaf with a really beautiful golden color and pleasing crispy crust.  I was surprised to find that it is also a more efficient baker than most of the metal pots I’ve tried. While it’s usually necessary to remove the lid after about 50 minutes and allow the loaf to brown and bake a few minutes more uncovered in a metal pot, when I lifted off the lid the loaf was already well- browned, fully baked, and ready to remove from the oven.


With that incredible smell wafting up I could hardly wait to cut some slices! (They are nice served right in the pot.) The pot is also convenient for storing the bread once both are cooled  or for reheating the boule again.

Whole Wheat & Bulgur Crusty Pot Boule


In honor of my new bread pot, I’ve created a new “kneadless” bread and am unveiling it here.  As you may know,  the Kneadlessly Simple method involves letting the dough simply stand, slowly ferment and bubble away for a number of hours. The fermentation action develops both full, complex yeast flavor and  a lot of gluten, so the dough actually kneads itself;  I’ve posted more info on this “self-kneading” phenomenon here.
 Since I’ve been interested in eating more whole grains lately, this loaf calls for half whole wheat and half unbleached white flour.  If you can find it, try white whole wheat flour, which is a new strain of whole wheat that is lighter in color and milder in flavor, yet offers the same nutritional advantages of regular whole wheat flour.  The King Arthur brand is sold nationally.  (If a plain white boule is more your speed, check out my peasant-style white pot bread here.)
To boost fiber, the recipe also calls for some bulgur wheat; it’s often stocked in supermarkets with Middle Eastern ingredients.   Like cracked wheat, or chopped wheat berries, it is a whole grain product, but the kernels are already par-cooked so they can be added in without any pre-soaking, boiling, or other advance preparation.  (They will be barely noticeable in the finished bread.) Don’t try to substitute cracked wheat, as the bits may not only remain too hard but absorb too much water, throwing off the correct consistency of the dough.  Even bulgur wheat will draw up some moisture as the dough stands, so it starts out slightly soft and then usually stiffens a bit during the long slow rise.
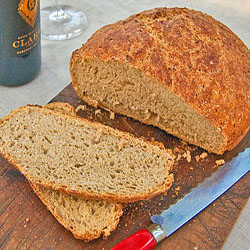
This is a wholesome, hearty, but not heavy boule that’s both  flavorful and astonishingly  easy to make.  Besides being completely “kneadless,” as the photos show the raised dough is simply scraped from a bowl into the preheated pot–which automatically does all the shaping for you.  This is a unique feature of many Kneadlessly Simple rustic pot breads  and dramatically reduces the usual kitchen muss and fuss associated with most bread making.
The bread is good warm, cut into large slabs and served along with a soup or stew, or cut in tidy slices and used for toast and sandwiches.
Tip:  Measure out the flour either by weighing it or by dipping down into the canister or sack with the appropriate dry measure and overfilling the cup slightly. Then with a metal spatula or straight knife blade sweep across the top, leveling the surface.  Don’t stir or fluff up the flour first; don’t try to compact it either.
1 1/2 cups (7.5 ounces) white bread flour, plus more as needed
1 1/2 cups (7.5 ounces) white whole wheat flour or regular whole wheat flour
3 tablespoons (1 ounce) dry uncooked bulgur wheat
Generous 1 1/4 teaspoons table salt
1/2 teaspoon instant, fast-rising or bread-machine yeast
1 1/2 cups ice water, plus more if needed
Corn oil, canola oil or other flavorless vegetable oil or oil spray for coating dough


First Rise: In a large bowl, thoroughly stir together the flours, bulgur, salt and yeast. Vigorously stir the water into the bowl, scraping down the sides and mixing until the ingredients are thoroughly blended. If the mixture is too dry to incorporate all the flour, stir in more water, a bit at a time, just enough to blend the ingredients and yield a slightly soft, but not wet dough . If necessary, stir in a little more water or more flour to yield a dough that slowly spreads out in the bowl.


Brush or spray the top with oil. Cover the bowl with plastic wrap. If desired, for best flavor or for convenience, you can refrigerate the dough for three to 10 hours. Then let rise at cool room temperature for 18 to 24 hours. If convenient, vigorously stir the dough once about halfway through the rise.


Second Rise: Using an oiled rubber spatula, gently lift and fold the dough in toward the center, all the way around, until mostly deflated; don’t stir. Brush or spray the surface with oil. Re-cover the bowl with plastic wrap that has been coated with nonstick spray. Let rise using any of these methods: for a 1 1/2- to 2 1/2-hour regular rise, let stand at warm room temperature; for a 1- to 2-hour accelerated rise, let stand in a turned-off microwave along with 1 cup of boiling-hot water; or for an extended rise, refrigerate, covered, for 4 to 24 hours, then set out and let it come to room temperature. Continue the rise until the dough doubles from the deflated size; remove the plastic if the dough nears it.


Baking Preliminaries: 20 minutes before baking time, put a rack in the lower third of the oven. Set the pot and its lid on the rack to heat at the same time. Preheat to 450 degrees F. Heat until the oven reaches 450, then continue 5 minutes more to thoroughly  heat the pot or Dutch oven. Remove the pot, using heavy mitts and place on a dry tea towel .  If you aren’t sure whether the dough will stick to the pot or not, spritz its interior with a little non-stick spray. Taking care not to deflate the dough (or burn yourself),  immediately loosen it from the bowl sides with an oiled rubber spatula and gently invert it into the pot. Don’t worry if it’s lopsided and ragged-looking; it will even out during baking. Generously spritz or brush the top with water. Immediately top with the lid. Shake the pot back and forth to center the dough.


Baking:  Lower the heat to 425 degrees F. Bake on a lower rack (but not bottom rack) for 55 minutes. Remove the lid. If the dough looks well browned and very crusty, it may be done. Test with a skewer or an instant-read  thermometer  in the thickest part; if it comes out clean or registers 209-212 degrees, set the pot on a wire rack and let the bread cool for 5 minutes.  If the dough top still looks pale and slightly soft and the temperature below the target range, reduce the heat to 400 degrees F. Bake, uncovered, for 10 to 20 minutes longer, or until the top is well browned and a skewer inserted in the thickest part comes out with just a few crumbs on the tip (or until center registers 209 to 212 degrees on an instant-read thermometer). If the thermometer is at all moist or full of crumbs, bake 5 minutes longer to ensure the center is baked through. Cool in the pan on a wire rack for 10 to 15 minutes. Remove the loaf to the rack and cool thoroughly.


Storing: Cool completely before storing. To maintain the crisp crust, store the loaf draped with a clean tea towel or in a heavy paper bag. Or store airtight in a plastic bag or wrapped in foil: The crust will soften, but can be crisped by reheating the loaf, uncovered, in a 400 degree oven for a few minutes. The bread will keep at room temperature for three days, and may be frozen, airtight, for up to two months.

Makes 1 large loaf (about 2 pounds), 12 to 14 slices.Interested in whether “kneadless” bread is a passing fancy or here to stay–survey results here reveal some interesting answers

If you lack a suitable bread pot, but are in the mood for “kneadless” bread, check out my cheddar and chiles loaf.

Print Friendly, PDF & Email
FacebooktwitterredditpinterestlinkedintumblrmailFacebooktwitterredditpinterestlinkedintumblrmail

Filed Under: Uncategorized Tagged With: heat-resistant handmade bread pot, no-knead bread recipe, perfect stoneware kneadless bread baker

Previous Post: « Secrets to Successful Food Blogging — “Life’s a Feast” Host Jamie Schler Shares Her Recipe for Success
Next Post: What Cookbook Editors are Looking For–Two Top Cookbook Editors Dish Out Details »

Reader Interactions

Comments

  1. Nancy Baggett says

    June 27, 2016 at 7:17 pm

    I’m not certain because I haven’t tried it, but I think you will have to stiffen the dough with some extra flour before the second rise. I suspect that it will just spread too much if not contained in a pot or stiffened. Yes, you could probably let it rise on parchment, then slide it in with a peel. So delighted to hear you like the book so much 🙂

  2. Susan Hyam says

    June 26, 2016 at 7:26 pm

    Hi Nancy, I have enjoyed using your book since 2010. I am very happy making the olive rosemary and walnut bread recipes. I always use one half whole grain flour and one half all purpose and the results are terrific. I use a $35 Ikea cast iron pot for the baking and results are fine.
    I have just acquired a 2cm black granite baking stone for use with pizza doughs. I’d like to make a round boule and try baking it freestyle on the stone. Most of your Boule recipes require plopping the dough into the hot pot. Which would be the best to shape the ball sized loaf and rise it (on parchment paper or?) then slide it with my Pizza peel onto the 400 degree heated baking stone into my oven? I would have the pan of icewater under the baking stone to provide the necessary steam for the early stages of baking. LOVE YOUR BOOK!!! have told all my baking friends about it.

  3. Nancy Baggett says

    May 18, 2015 at 3:28 pm

    Thanks, Mary, I had not thought of that. I don't normally make my own yogurt, but I could save the whey that collects on top of the plain yogurt I use. I have also actually used a little plain yogurt in several breads–it produces a very nice loaf.

  4. Mary says

    May 18, 2015 at 2:25 pm

    I have been doing bread like this since I read the NY times article on bread without kneading. I love it. You might try using whey in the making of the bread instead of water. I make my own yogurt and the left over whey makes wonderful bread.

  5. Clay Coyote Pottery and Gallery says

    February 20, 2012 at 4:06 pm

    I meant to add that we have Nancy's book available and it includes a $10 coupon for a future Clay Coyote purchase, or $10 of if you order a pot with the book. http://bit.ly/kneadlesslysimple

  6. Clay Coyote Pottery and Gallery says

    February 20, 2012 at 2:16 am

    Thanks for giving our No-Knead baker a try, Nancy. We love the recipe and the bread. For those who haven't tried it, it makes the perfect french toast, too!
    The Clay Coyote Baker can also be used as a standard casserole, also.
    http://bit.ly/zy7dG7

  7. Nancy Baggett says

    February 19, 2012 at 1:03 pm

    Marcia, thanks for stopping by–perhaps we will meet in person some day. Yes, the book is great for the "bread challenged!" But at the same time delivers very good quality. I hope you'll try it.

  8. Marcia says

    February 19, 2012 at 12:01 am

    I have tried the oat bread from your book that Don had when we got married 2 years ago….delicious. This looks like something I could try, since I am bread making challenged! Marcia Reinoehl

  9. Nancy Baggett says

    February 18, 2012 at 4:25 pm

    Deeba, I was also amazed that their bread pot was so reasonably priced–I think their catalog says about $50! This is less than even a semi-nice enamel coated metal pot. I think I'm going to start giving them as gifts to the other no-knead bread bakers in my family.

  10. Deeba PAB says

    February 18, 2012 at 4:05 pm

    I love the look and feel of the bread…full of rustic goodness nancy. That clay pot is to die for. I love the ease and flavours of No Knead bread, and this one looks exceptional!

  11. Nancy Baggett says

    February 18, 2012 at 2:19 pm

    Dena, it wonderful to hear that my book got you started with yeast baking–that is exactly what I hoped would happen. So many people are hesitant to try it, and this method makes it pretty foolproof.

    Jamie, I didn't go into all the details in the post, but the good color and flavor result from the method. It calls for starting with ice cold water (called delayed first fermentation), and the dough rises very slowly over a long period. This encourages enzyme activity that improves taste, texture and crust color. Incidentally, the self-knead approach was the way bread was made before peeps discovered kneading.

  12. Jamie says

    February 18, 2012 at 11:53 am

    The bread is gorgeous, perfect texture and the color does make it look flavorful; the perfect boule to go with a bowl of soup or a salad lunch. And the clay pot is really beautiful. This was an interesting and informative post, Nancy, and now I want to go out and check out clay cooking and baking pots. Really a pretty way to serve bread – and I have been making more no-knead bread lately. I need to find your book!

  13. Dena says

    February 17, 2012 at 10:41 pm

    I got your Kneadlessly Simple book for Christmas and my first bread recipe ever was the Easy Pot Boule. It was easy, even though I messed it up in the beginning. I also ended up using too wide of a pot and the bread baked thin. Instead of a being round and soft, it was chewy and not very deep. We turned them into "breadsticks" and it worked just fine. I can't wait to try another pot boule again!

Leave a Reply

Your email address will not be published. Required fields are marked *

Primary Sidebar

  • Email
  • Facebook
  • Instagram
  • LinkedIn
  • Pinterest
  • RSS
  • Twitter

Welcome to KitchenLane! It’s a comfortable place where I create, thoroughly test, and photograph recipes for my cookbooks and blog. All my recipes are original, not adaptations from others. I trained as a pastry chef, so many offerings are desserts and baked goods. Some are also healthful, savory dishes I contribute to healthy eating publications. My recipes are always free of artificial dyes, flavorings, and other iffy additives, which I won’t serve my family—or you! Instead, dishes feature naturally flavorful, colorful ingredients including fresh herbs, berries, edible flowers, and fruits, many from my own suburban garden or local farmers’ markets. Since lots of readers aspire to write cookbooks, I also blog on recipe writing and editing and other helpful publishing how-to info accumulated while authoring nearly 20 well-received cookbooks over many years.


The Art of Cooking with Lavender

The Art of Cooking with Lavender
 

The 2 Day A Week Diet Cookbook

Now available on Amazon! The 2 Day a Week Diet Cookbook
75 Recipes & 50 Photos
 

SIMPLY SENSATIONAL COOKIES

Simply Sensational Cookies
Visit the book page.
 

KNEADLESSLY SIMPLE

Kneadlessly Simple
Visit the book page

The All-American Dessert Book

The All-American Dessert Book
Visit the book page

The All-American Cookie Book

The All-American Cookie Book
 

Nancy Baggett’s Food Network Gingerbread Demo!

Watch demo HERE. Find Cookie Recipe HERE.

Secondary Sidebar

Archives

Kitchen Lane Trailer

Nasturtium Recipes & Quick Tricks

Nasturtium Recipes & Quick Tricks

Violet Quick Tips

Violet Quick Tips

Fun, Easy Cookie Decorating with Marbling

Fun, Easy Cookie Decorating with Marbling

Pretty Piping with Only a Baggie

Pretty Piping with Only a Baggie

Latest Video – Pretty Daisy Cookies

Pretty Daisy Cookies

Fun, Quick Cooking Baking with the Kids Video

Fun, Quick Cooking Baking with the Kids Video

The Best Way to Roll Out Cookie Dough

The Best Way to Roll Out Cookie Dough

The Best Way to Roll Out Cookie Dough

- Part 2 -

Best Tips for Cutting Out Cookies

Featured Bread Recipe and Video

Featured Bread Recipe and Video

Most Popular Posts

Getting to Yes on Foodgawker and Tastespotting (My Six-Month Journey, Plus Tips)

Strawberry-Rhubarb Freezer Jam–Spring in Every Jar

The Kneadlessly Simple Crusty White Pot Bread

Featured Bread Recipe and Video

Copyright © 2025 · Nancy Baggett's Kitchenlane. All material on this website is copyrighted and may not be reused without the permission of Nancy Baggett.