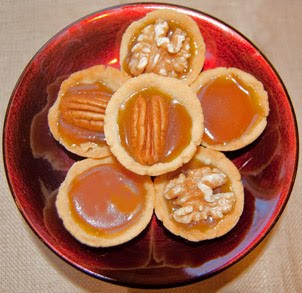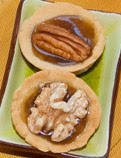
A guest at a book signing once confided that the pictures of dishes in my cookbooks were her proof that at least those recipes had been tested once! This made me burst out laughing! I then had to explain that this struck me funny because I test all my recipes–not just the ones we photograph–a lot! For example, to get these Ooey-Gooey Maple Mini-Cups the gooey consistency I wanted, I tested the recipe three times.
A little motto sums up my process: “Never guess, always test.” This means that if, after I make a recipe and taste it, I think it needs some adjustments–say more salt, or sugar, etc., or longer baking–I test it again. It’s just not possible to know how a dish is going to come out without making it exactly as written.
Actually, all the experienced and successful food writers and cookbook authors I’ve talked with say they test every recipe, often multiple times. Here’s what cookbook author and chef Terry Thompson Anderson, has to say: “If, after a second testing, I don’t feel really enthusiastic about a new recipe, it gets scratched. But if I know it has potential, I keep testing until it works perfectly and I have the taste, spiciness, sweetness, times/temperatures, and methods right.” Obviously, she’s mindful that she has to detail all this information, or end users, readers like you, won’t be able to successfully duplicate her dish.
Jill Silverman Hough, also a food writer, adds that some recipes, especially desserts and baked goods, require many, many tests: “The quince tarte tatin I created for a Bon Appetit piece took 7 attempts and 2 cases of quince to get the proportions of fruit/sugar/juiciness right! I haven’t tested anything that much before or since, but I do find that baked desserts take more tries than anything else.” Rose Levy Berenbaun has said she once tested a cake for The Cake Bible over thirty times! I once tested a devil’s food cake that’s in my All-American Dessert Book 14 times! I was so “tested out” that even though I finally thought it was perfect, I could only eat two bites!
For the Ooey-Gooey Maple Mini-Cups here I had to keep fiddling to get just the right amounts of filling and dough and to prevent the maple caramel from crystallizing. Five days later, the maple caramel filling is still smooth–thanks to the anti-crystallizing properties of the corn syrup. If you object to high-fructose corn syrup, use the Karo brand, which is made without it. Don’t just try to just omit the corn syrup; the maple filling will turn gritty. I also tweaked the shortbread shells so they would be melt-in-the-mouth tender and only faintly sweet. This helped them pair perfectly with the sweet, intensely “maplely” centers.
The barely sweet maple shortbread shells are completely baked first. Then the caramel is simply poured into the cups. Since adding eggs or a thickening starch would partly mask the pure, unadulterated maple syrup taste, the filling stays slightly saucy and succulent and never sets up firm the way a tassie filling does.
Let me add that these are designed for serious maple lovers: Fans of artificial maple flavor and those who are ho-hum about real maple syrup may want to skip on by!
- ½ cup (1 stick) cold unsalted butter, divided
- 1 cups plus 1 tablespoon all-purpose white flour
- 3 tablespoons maple syrup, preferably dark amber, plus ¾ cup more for filling
- ½ teaspoon vanilla extract
- 3 tablespoons light corn syrup
- 24 lightly toasted perfect walnut or pecan halves, optional
- Coarse crystal salt for garnish, optional
- Place a rack in the upper third of the oven; preheat to 350 degrees F. Generously spray 2 12-cup mini-muffin pans with nonstick spray.
- Cut 5½ tablespoons butter into chunks. Combine the butter and flour in a food processor. Process in on/off pulses until the consistency of crumbs. In a small bowl or cup stir together 3 tablespoons maple syrup and vanilla until well blended. Pour the mixture over the flour mixture. Process in on/off pulses until just evenly incorporated; don’t over-process. If the mixture seems too dry to hold together, add a teaspoon more maple syrup and process just to incorporate it. Carefully remove the processor blade. Shape the dough into a flat disc.
- Divide the disc into quarters. Divide each quarter into 6 equal portions, then roll them into balls. With a thumb or knuckle, press each ball into a mini-muffin cup so the dough is pushed up the sides evenly all the way around and forms a deep well. Be sure to work the dough up the sides so that the bottom isn’t overly thick and the well is as large as possible.
- Bake (middle rack) for 11 to 14 minutes, or until lightly colored and slightly darker at the edges. Let stand until cooled. Using the point of a knife, loosen and gently lift the shells out to a rimmed, parchment-lined baking sheet.
- In a heavy 2-quart saucepan bring ¾ cup maple syrup, 2½ tablespoons butter and the corn syrup to a boil over medium-high heat. When the mixture comes to a rolling, foamy boil, start timing and boil 2 minutes longer, stirring once or twice. Then, stirring frequently and watching carefully to prevent scorching, boil 1½ minutes more; the mixture should turn slightly more amber in color but not darken completely. Remove from the heat and let cool slightly. For easy pouring, transfer the filling to a 1-cup measure. Pour the filling into the shortbreads, dividing it evenly among them.
- Let the mini-cups stand until cooled. If desired, place a walnut or pecan on top of each. Sprinkle the tops very lightly with sea salt, if desired.

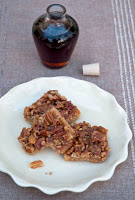
For another tempting maple recipe, check out these delish maple bars.


Great post! I think one of the big differences between writing a recipe for a cookbook and writing a recipe for a blog is that a cookbook (or a printed article for that matter) is permanent. That recipe better be darn solid to be able to have it permanently on paper! With a blog, there's more wiggle room. Though not ideal, you certainly go back and adjust the recipe on the blog after getting feedback from readers saying it didn't work the way you expected it to.
That said, when I started my blog, I would make an item once and then post it. Now, when post something, especially when I develop my own recipe (as opposed to just adapting someone else's recipe, which I find myself doing less and less) I end up testing it two or three times until I feel like it's blogworthy. And yes, I usually rely on my partner to tell me if it's good enough to blog, or if it's just passable enough for us to eat but not share to my readers.
If I ever get the chance to write a cookbook, I know I'll be testing and retesting those recipes even more so!
Having successfully made (and enjoyed) so many of your recipes, I know without a doubt that they have been tested multiple times. I admire the patience and perseverance and the people who enjoy my treats thank you! My husband has a little code for my dinners and "once a week" is his highest praise. 🙂
Good information–thanks!
Hey Julie, thanks for stopping by. I love sharing info, and since I've been doing this a long time, can draw on a lot of things I've done both right and wrong.
Fascinating post – you are such a gem to share your expertise so generously. I'm completely hooked.