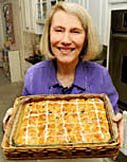
Several weeks ago, Baltimore Sun reporter Susan Reimer came to my kitchen to watch me prepare my no-knead version of the traditional Easter-time favorite, hot cross buns. She said she had always been worried about baking with yeast, but after seeing how easy my “kneadless” method was, she was convinced she could make these fragrant Good Friday treats, too. The method is the same one I use in my new Kneadlessly Simple cookbook.
 As you can see from the photo taken at the time, I bake the buns in a 9- by 13-inch baking dish that is handy for serving at a holiday breakfast or brunch. When the lightly-spiced, currant-studded buns rise, they gradually expand and fill the dish, but they readily pull apart and form individual buns when served. The dough can be readied and shaped well ahead, then held in the refrigerator and conveniently baked as needed.
Hot cross buns originated in Britain at least five centuries ago and continue to be enormously popular today. In eighteenth- and nineteenth-century London, the street vendors’ call of “One-a penny, two a penny, hot cross buns on Good Friday,” was a familiar sound—but only on one day a year, the Friday before Easter. According to Elizabeth David, author of the esteemed English Bread and Yeast Cookery, spiced breads similar to the modern buns were, by government decree, only permitted for certain special occasions, specifically burials, Christmas, and Good Friday. The reason, the author says, is that spiced breads could not conform to the weights required under the strict bread laws guaranteeing a full loaf for the set price.
Hot cross buns are no longer hawked on London streets, and, in fact, bakeries now sell them well ahead and close on Good Friday. But both in Britain and in this country, many familes follow the custom of serving hot cross buns for Easter, though often on Sunday rather than Friday. The name comes from the fact that bakers originally slashed a cross in each top, a symbolic reminder of Christ’s crucifixion. Home bakers still form a cross on the buns today, usually by drizzling over crisscrossed lines of icing. I like to cut a cross in the tops and accent the buns with lines of icing.
The buns are best served fresh and warm, so for convenience you may want to use the “extended” refrigerator rise option for the second rise and hold them until needed. Refrigerate the panned buns for up to 48 hours ahead, then let them warm up and double from their original size (usually 1 to 1½ hours) before baking.
- About 3½ to 4 cups (17½ to 20 ounces) unbleached all-purpose white flour, divided
- ¼ cup granulated sugar, plus 3 tablespoons more, divided
- Generous 1 teaspoon plain table salt
- 1 teaspoon rapid rising, bread machine or instant yeast
- ½ teaspoon ground cinnamon
- ¼ teaspoon ground cardamom or ⅛ teaspoons ground cloves
- Scant 1¼ cups ice water (mix cold water with heaping cup of ice cubes for 30 seconds before measuring), plus more ice water if needed
- Grated zest (colored part of the peel) from 1 small orange
- ½ to ⅔ cup dried currants or dark, seedless raisins, soaked in hot water 5 minutes, then drained well and patted dry on paper towels
- 5 tablespoons unsalted butter, melted and cooled slightly, divided
- 1 large egg, at room temperature
- ⅓ cup instant nonfat dry milk powder
- ⅔ cup powdered sugar blended with 2½ tablespoons orange juice until smooth and very fluid, plus more powdered sugar as needed
- In a 3-4 quart bowl thoroughly stir together 2½ cups flour, ¼ cup sugar, salt, yeast, cinnamon, and cardamom. Stir in the water and orange zest then 3 tablespoons butter and currants, scraping down the sides and stirring just until the ingredients are thoroughly blended. The mixture should be fairly stiff; if necessary, a bit at a time, stir in just enough more flour to thicken it slightly. Brush the dough top with a little more butter. Cover the bowl with plastic wrap. Optional step: for best flavor or convenience, you may refrigerate the dough for 3 to 8 hours. Or simply set it out at cool room temperature (about 70 degrees F) for 8 to 12 hours.
- Using a fork and working in a medium bowl, beat the egg lightly. Remove about half of it and reserve, covered, in the refrigerator to brush over the dough just before baking. Beat together the remaining egg, the milk powder and 3 tablespoons granulated sugar until well blended. Vigorously stir this mixture into the dough, scraping down the bowl sides. Gradually stir in ½ to ¾ cup or enough more flour to yield a fairly stiff dough. Then, sprinkling over more flour and turning the dough as you work, smooth and press it into the surface until the dough is stiffened enough to almost hold its shape and is easier to handle. Set aside to firm up for 5 minutes.
- Generously butter a 9- by 13-inch (or larger) flat baking dish. Generously dust a large cutting board with flour. With flour-dusted hands, transfer the dough to the cutting board. Using a buttered sharp serrated knife, cut the dough into quarters. Then shape a quarter into an evenly-thick log, dusting with flour as needed. Cut the log crosswise into 5 or 6 squarish buns. Dust them with flour and pat them into a rounded shape; don’t worry about making them perfect. Place them evenly spaced in an even row down the length of the dish, then pat down slightly. Repeat with the remaining portions, adding three more rows and filling the interior. Brush any remaining butter over the buns. If desired, cut a ½-inch deep cross in the center of each bun; buttered shears work best. Cover the dish with nonstick spray-coated plastic wrap.
- Let rise using any of these methods: for a 1½ to 2½ hour regular rise, let stand at warm (74-75 degrees F) room temperature; for a 1 to 1½ hour accelerated rise, let stand in a turned-off microwave along with 1 cup of boiling hot water; or for an extended rise, refrigerate, covered, up to 48 hours, then set out at room temperature. Continue the rise until the dough nears the plastic. Remove it and continue until the dough doubles from its deflated size.
- Fifteen minutes before baking time, place a rack in the lower third of the oven; preheat to 375 degrees F. Add 1 tablespoon warm water to the reserved egg, then brush this glaze evenly over the buns.
- Lower the heat to 350 degrees F. Bake for 17 to 22 minutes, until the tops are nicely browned and a skewer inserted in the thickest part comes out with just a few particles clinging to the bottom. Bake 3 to 4 minutes more (or to 203-206 degrees F on an instant read thermometer) to be sure the centers are done. Transfer the dish to a cooling rack. Immediately brush the tops of the buns with the icing; it should be fairly fluid, so add a little water or sugar if needed. Repeat with a second layer of icing. Add enough more powdered sugar to stiffen the remaining icing to piping consistency. Put it in a piping bag or sturdy plastic baggie. Snip off the tip or a bag corner, then drizzle icing to form a cross on each bun, as shown. Let the buns cool just slightly, then serve immediately.
 Another great spring recipe you might like–all-natural berry and orange buttercream for cupcakes.

BoB, your suggestions are good ones. If a decision is ever made to do a new edition, these would be wise changes to make. However, the publisher would not be willing to alter the whole basic format otherwise–nobody in the cookbook industry these days could afford to do that due to very modest profits.
I have also found the instruction paragraphs confusing in Kneadlessly Simple, especially the optional refrigeration. My book is full of pencil marks where that seperate the instructions. this is the only shortcoming with the book.
Nancy, please ask your editors to try bullet points or a list instead, or even make each step a new paragraph.
First Rise
In a 3-4 quart mixing bowl thoroughly stir together 2-1/2 cups flour, 1/4 cup sugar, salt, yeast, cinnamon and cardomom.
Stir in water and orange zest, then 3 Tbsp. butter and currants, scraping down the sides of the bowl and stirring just enough to mix all the ingredients are thoroughly blended.
The mixture should be fairly stiff. If necessary, a bit at a time, stir in just enough flour to thicken slightly.
Brush the top of the dough with a little more butter.
Cover with plastic wrap and let stand 8-12 hours hours.
Optional: For flavor or convenience, you may refrigerate the dough for up to 8 hours before rising.
BoB Underwood
Seattle
The "optional" part is the refrigerating of the dough. If you want to immediately set the dough on the counter and skip the refrigeration stage you can. The rise on the counter can't be skipped because that is when the yeast actually becomes active and bubbly, which is what takes the place of kneading. The optional step is a convenient way to stall if you aren't going to be around in 8-12 hours the countertop rise requires. The refrigeration does also produce a slighly more flavorful dough, though it's good without it. Happy Baking!
I find the first rise step confusing, where you say, "Optional step: for best flavor or convenience, you may refrigerate the dough for 3 to 8 hours. Or simply set it out at cool room temperature (about 70 degrees F) for 8 to 12 hours." Do you mean the optional refrigeration step followed by the 8 – 12 hours rise at cool room temperature, or is the refrigeration instead of the room temperature rise? (In which case it seems odd because the time in the refrigerator is shorter.) Thanks.