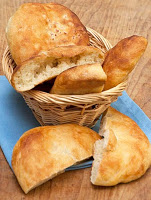
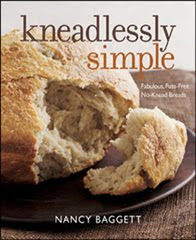
 It always makes my day when I hear that somebody really likes an article, or recipe, or, wow! one of my books. So imagine my excitement when a reader sent me this terrific pita bread recipe he’d created using my Kneadlessly Simple book as a guide.
BoB from Seattle said he’d enjoyed using the method in my book so much he decided to convert his traditional pitas to the kneadless approach. I’m delighted to say his recipe came out just great!
BoB also wrote with several other “kneadless” baking suggestions I think you might find helpful: “I bake in a LeCreuset 3-1/2 qt. oval “French Oven” because I like the oval-shaped loaf better. For consistent slices, I use a deli type meat slicer adjusted to the widest setting, which is about the thickness of store bought bread slices.”
Actually, I receive quite a bit of nice email about my Kneadlessly Simple bread book–and let me assure you I read every word and am thrilled every time. (Most writers I know feel exactly the same way.) So don’t ever think your remarks are met with a “ho-hum!”
Please forgive me for going on about this, but I want to share a couple more reader compliments that have meant a great deal to me. Then I’ve posted excerpts from some reader questions, along with my answers–which I believe you’ll find useful. (For more q & a info go here. Or for a completely different recipe, my kneadless cheddar cheese bread, go here. )
“My step-son gave us Kneadlessly Simple last winter and I’ve been baking bread from it ever since. It’s a FABULOUS book and has revolutionized bread-baking in our house. It’s now a weekly or bi-weekly event – we just don’t buy bread any more, the loaves I bake from your recipes are so much more delicious. Thank you for putting together such a useful book….”
Said another writer: “I am hopelessly hooked on this Kneadlessly Simply baking technique. Between your book, which I have purchased along with the Dessert Book … and King Arthur flours, we are going to be well fed. My first recipe attempt from KS was the English muffin bread–oh my, it turned out so well. Fresh bread and home made grape or blackberry jam, what a way to start the day!”
This same reader also passed along a handy tip: “Instead of using the iced water, I use the water directly from the refrigerator dispenser. Waiting until just before adding the flour to the recipe, it stays cold in the fridge. I checked the temperature, and it was about 51 degrees–I figured that was close enough.” (She’s right, it is!)
Now for some great questions readers have asked:
Q Your recipes usually say that when the dough is first mixed it should be stiff. How stiff is “stiff”? I watched the video on your website, hoping you would address this, but no luck. Any more guidance?
A For most recipes, the dough should come together and hold its shape, but not look dry. Gradually (over a half-hour or more), it may slowly slump and spread out in the bowl. That said, doughs with lots of seeds, cracked grains, etc., need to be soft enough to spread out some at the start, as the particles will absorb a lot of moisture during the long standing period and gradually stiffen the dough; individual recipes always indicate the consistency you need. The good news is that hydration can vary a lot with the recipes and still yield good results. The trick is just to stiffen doughs with extra flour right before the second rise if they are soft and spread instead of holding their shape.
Q Is it reasonable to conclude that after some period of time (a couple months) that the local yeast will be dominant in the culture over the initial domestic variety used to kick-start the process in your cultured sourdough starter? I know this is the case for wild yeasts imported from different regions, i.e. they give way to local, but wasn’t sure about commercial domestic vs. local wild.
A I am pretty certain that the starters I made using a little commercial yeast (the recipe in the book), are now lacking the commercial yeast and are taken over by local critters. The reason is that as the lactic acid builds up the commercial yeast organisms have more and more trouble surviving–they don’t tolerate acid like the wild starter yeasts do, so they die off. As for how long this takes, I think it’s just the time taken for the acid to build up a lot. Exactly what’s now in the various starters, I don’t know. I’d have to get a lab to do an analysis to say for sure.
Q For ecological reasons, I’d like cover my dough with a clean dishtowel instead of a sheet of plastic wrap. Is this okay?
A I actually thought about this issue in creating my recipes. However, a dish towel allows some moisture to escape, so the dough doesn’t stay quite as moist over the long rise. Also, if it rises up more than expected and touches the towel, it makes a mess! I reduce my use of plastic wrap by recycling food-safe biodegradable plastic bags obtained when I buy fruits and veggies in the supermarket. I slit the bags so they flatten out, and oil the side next to the dough so the plastic won’t stick to it if it rises high.
BoB’s Kneadless Pita Breads
Here is BoB’s very easy, very delicious kneadless pita bread recipe, which I’ve written up in the format used in my Kneadlessly Simple cookbook. The pitas are much lighter, fluffier, and more attractive than most I’ve tried. (The homemade are also s-o-o-o much better than bought.) The dough is somewhat like pizza dough.
I’ve not only stuffed them with hummus, but simply sliced them horizontally and used them with traditional sandwich fixings with excellent results. I also like the salt-garnished pitas simply dipped in some good olive oil—heaven!
Tip: You’ll need a very large baking sheet—about 15- by 18-inches—to bake all six pitas at once. Otherwise, just let them rise on two sheets of baking parchment and bake them in two batches. And don’t worry that the pitas will burn baked on the oven floor. The initial blast of intense just helps them puff and spring up properly; then they are moved to the middle rack to complete the baking.
3 cups (15 ounces) unbleached all-purpose white flour or white bread flour, plus more as needed
1/4 cup olive oil, plus more as needed
Generous 1 teaspoon plain table salt
3/4 teaspoon “rapid rise,” “quick-rise,” “bread machine” or “instant,” yeast
1 1/3 cups ice water (add 1 cup ice cubes to cold water and stir for 20 seconds before measuring), plus more if needed
Coarse salt for garnish, optional
First rise: In a food processor, combine a scant half of the flour and olive oil. Process until very well blended. (Alternatively, blend them together using a mixer.) Put the mixture in a large bowl. Thoroughly stir in the remaining flour, salt, and yeast. Vigorously stir the water into the bowl, scraping down the sides and mixing until the ingredients are thoroughly blended. If the mixture is too dry to incorporate all the flour, a bit at a time, stir in just enough more water to blend the ingredients; don’t over-moisten as the dough should be stiff enough to hold its shape without looking dry. If necessary, stir in enough more flour to stiffen. Brush the top with oil. Cover the bowl with plastic wrap (or a large recycled food grade plastic bag cut apart). If desired, refrigerate for up to 8 hours. Then let rise at cool room temperature (about 70 degrees F) for 12-18 hours. If convenient, vigorously stir the dough once about halfway through the rise.
Second rise: Vigorously stir the dough, adding in more flour if needed to make it stiff and easier to handle. Dust a large cutting board with flour. Turn the dough onto it and shape into an evenly-thick log. Then, with oiled kitchen shears, cut crosswise into 6 equal portions. Dust each portion with flour and shape each into a rough ball. Space the balls as far apart as possible on a large tray or cutting board covered with a 16 to 17-inch long sheet of baking parchment. Brush the tops with olive oil, then press out the balls into about 5 ½ to 6-inch rounds; they don’t have to look perfect. If desired, sprinkle a little coarse salt over top, pressing down to embed it. Tent the pitas with a sheet of aluminum foil, being sure the foil is well above the tops. Let rise for 1 to 1 1/4 hours at warm (74-75 degrees F) room temperature or until very light and puffy.
Baking Preliminaries: Twenty minutes before baking time, put a rack in the middle third of the oven and remove the lowest rack so you have access to the oven floor. Preheat to 500 degrees F. Set the baking sheet directly on the oven floor to preheat for 15 minutes.
Baking: Using mitts, remove the preheated baking sheet from the oven. Carefully slide the parchment containing the pitas onto the hot sheet. Return the pan to the oven floor and bake the pitas for 6 minutes, or until they puff and begin to color. Then transfer to the middle rack and bake 4 or 5 minutes, until they are nicely browned and just baked through. (Test with a toothpick skewer inserted in the thickest part; it should come out clean.) Cool until you can handle them, then halve and either pull or cut apart the pitas. Cool completely on a rack before packing airtight for storage.
Makes 6 approximately 7-inch pitas.

Several others have commented that they have only open coils on the oven floor. My electric oven has a metal layer covering the coils, so I didn't even think about the problem. Yes, I think it would be fine to cook the pitas on a griddle. If there is a problem with them getting baked through or burning on the outside, you could start them on the griddle, then put them in the oven preheated to 500 degree F. to finish them.
I make yeastless pitas most of the time, cooking them on a griddle which makes them puff just great. But I like the look of those and would like to try this recipe, but my oven is electric, so no putting the pan on the oven floor. Do you think I could use this recipe and cook them on the griddle the way I've always done it?
Thanks!
I never thought of making pita at home. I will have to try this.