 It’s popsicle weather again. Bright, hot, and a holiday weekend to boot. So I’m back experimenting with homemade popsicle recipes, especially ones that feature all-natural flavors and colors so I can feel comfortable serving these treats to my grandkids. Except for the chocolate-banana pops, my recipes rely solely on pure fruit juice or fruit juice concentrates and are completely free of artificial food colors. (For more sophisticated pop flavors, such as pomegranate and orange, go here.)
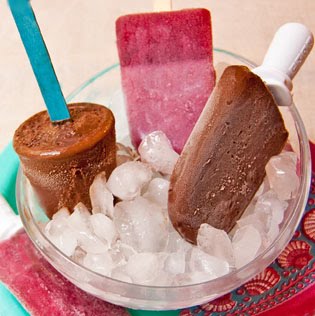
As you can see from the pics, these pops can be readied using simple commercial plastic popsicle molds bought in a discount department store; ordinary 3-ounce plastic cups with wooden sticks from a craft store; or a Zoku quick popsicle maker. At around $50 it’s a luxury, but lots of fun. (The unit works like the ice cream makers with freeze-ahead tubs, and, once well-chilled, it turns out three pops in 8 minutes, and another 3 in about 10 minutes more. Note that it doesn’t come with recipes.)
 For “two-tone” pops, just fill the molds or plastic cups partly full; freeze until fairly firm; then add the contrasting color; and freeze again until completely hard. The multi-colored pops are a snap in the Zoku maker, since the layers freeze quickly.
Don’t substitute granulated sugar for the honey in these recipes; it doesn’t dissolve readily, so can result in gritty popsicles.

1/3 cup boiling water
1 ounce semisweet or bittersweet chocolate, chopped
2 1/2 tablespoons unsweetened cocoa powder (either American-style or Dutch process)
1/3 cup clover honey or other mild honey, or more to taste
1 very large (or 2 small) over-ripe bananas, peeled and cut into chunks 1/2 cup cold water
 Easy Fruit Juice Pops (Makes 6 3-ounce pops)
For single color pops, proceed following the directions below. For optional two-tone pops like the raspberry one shown in the top pic: Mix up the juice mixture as directed. Pour a half to a third of it into a separate cup, then stir in the yogurt until completely blended and smooth. Partially fill the popsicle forms with one color mixture and let it freeze. Then, add the second mixture and continue freezing until thoroughly frozen.
Tip: If readying the pineapple pops, be sure to add the vanilla. It really brings out the pineapple flavor.
1 cup cold water
1/4 teaspoon vanilla extract, optional
2/3 cup undiluted, still partially frozen white grape-raspberry juice concentrate, or pineapple juice concentrate
1 to 2 tablespoons clover honey, to taste, optional
About 3-4 tablespoons regular or lowfat sweetened vanilla yogurt (optional, for two-tone pops)
In a 2-cup measure very thoroughly stir together the water, vanilla (if using) and undiluted fruit juice concentrate until blended. Taste and add honey, if desired; stir well as it takes a while to dissolve.
If making ice pops using 3-ounce plastic cups or commercial plastic popsicle molds, pour the mixture into them until they are a little more than 3/4s full. If using molds, add the plastic sticks as directed. If using paper cups cover each with a small square of foil; make a slit in the center top; and insert wooden popsicle sticks into the cups. Freeze the molds or cups until the popsicles are completely frozen; depending on the freezer this may take 3 to 4 hours or longer. Remove the popsicles from the molds or cups by dipping their exteriors in warm water for 10 to 20 seconds (don’t overdo it!), and/or flexing the cups or molds until the popsicles loosen from the sides. If necessary, loosen the pops from the sides using a table knife to break the vacuum.
If using a Zoku pop maker: Cover and refrigerate the fruit juice mixture until well-chilled, at least several hours. Have the Zoko maker thoroughly frozen (24 hours). Insert the Zoku plastic sticks into its molds as directed. Pour the mixture into the Zoku molds up to the fill line. When the pops are thoroughly frozen, remove them from the molds using the orange tool as directed. Do not try to pry the pops from the molds using a knife, as the interior of the molds may be damaged. Add new plastic sticks and make a second round of pops, if desired.
Eat the pops immediately or place in baggies or small containers and freeze for later use.
For other naturally colorful pops more geared to grownup palates check out the pomegranate-orange pops and grapefruit pops here.


Yes, this link will take you to pops that just use fruit juice:
http://www.kitchenlane.com/2010/07/homemade-ice-pops-deliciously-easy.html
Do you have any recipes using fresh juice instead of concentrate ?
Made these for my kids–so good. And easy.