When the newly-formed bloggers’ Breaking Bread Society (details here) told me they get together virtually to bake a monthly bread and asked me to join in, I had to participate. The founding members, Shulie, of foodwanderings, Lora, of CakeDuchess and Marnely of Cooking with Books hope their plan will encourage more people to find time for homemade yeast bread in their lives, a motion I heartily second!

If you follow my blog at all, you know I’m always advocating this myself. Not only does homemade bread fill the house with the most incredible aroma and add a special touch to even the plainest meal, but I think that working with such pure, simple ingredients as flour, yeast, salt and water is good for the soul. It certainly makes me feel renewed and righteous!
I was excited to see that the basic recipe being featured by the group this month was a focaccia from Nick Malgieri’s How to Bake book. I have known Nick and admired his work for a very long time, and in fact, he even did me the honor of reviewing my Kneadlessly Simple cookbook manuscript and writing a very nice comment for the jacket. I knew his recipe would be a winner—and it definitely was!
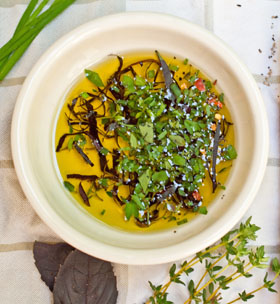
That said, I generally prefer to put my own spin on another author’s recipe, so decided to take his traditionally-prepared formula and convert it to my favorite no-knead, cold-rise method. The ingredients are the same, except my method requires adding a little more water (for a moister dough) and a good deal less yeast. I also topped my version with my own herb-seasoned olive oil shown below left. In case you are new to “kneadless” breads and the cold water, slow-rise approach, here are a couple important facts you should know.
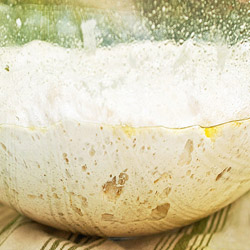
 First, no-knead bread is not in fact unkneaded, but rather it just kneads itself—really!
Here’s how it works: The dough, which is on the slightly moist side, sits and bubbles from fermentation for a long time. Though you can barely see it, the natural bubbling and heaving action (shown in the photo below right) develops the gluten quite thoroughly. Trust me—if the dough is allowed to stand the 12 to 18 hours suggested, it will be as well kneaded as dough worked with a bread hook. While the dough is doing its thing, you can go off to work, or shop, or sleep and come back hours later and start the second rise when it is convenient for you. The other obvious advantage is that with NO kneading, you avoid virtually all the usual counter top muss and fuss.
 The cold water, slow-rise approach, technically known as “delayed first fermentation,” is another key aspect. I first learned about it from another colleague and friend Peter Reinhart, who raved about the wonderful flavor and color it imparted in the Pain a l’Ancienne recipe (p. 191) in his seminal The Bread Baker’s Apprentice. (He and I actually met when that book and my All-American Cookie Book were competing for an IACP award. I knew, as soon as I saw his book that it would win, and told him so. It not only won the baking category, but both IACP and James Beard book of the year honors!)
This technique involves starting with ice cold water; using a modest amount of fast-rising, instant, or bread machine yeast (regular active dry yeast doesn’t work well); and allowing the dough to warm up and ferment very slowly. Due to the cold environment, the yeast activity is delayed for a number of hours, allowing a host of enzymes to positively affect the dough texture and color in many ways too complicated to explain. The long, cool rise—which takes no effort at all, just planning ahead and patience—also encourages loads of flavor development, so the resulting bread tastes and smells similar to true multi-stage artisan loaves, but involves none of their futzing!
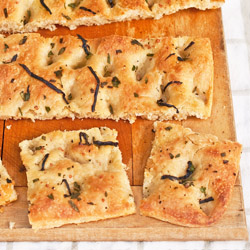
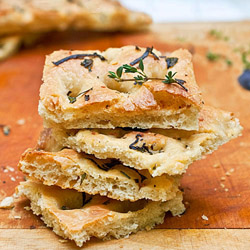
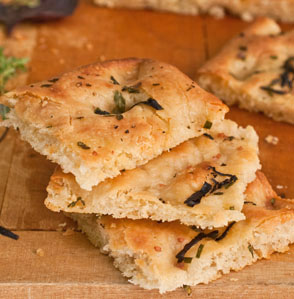 Puffed all over with tiny air pockets, crackly-crisp, and savory from the long cool rise and herb oil blend, this focaccia is hard to resist. My hubby and I dove in when it was still almost too hot to tolerate and couldn’t stop snacking. Note that this focaccia is very thin—about as thick as pizza crust. However, I’ve provided alternative directions should you prefer a thicker, less crispy (and more typical) version.
Tip: Don’t try to heighten the flavor by incorporating extra herbs into the dough. Some, like oregano and thyme, have yeast inhibiting chemicals that, in quantity, can discourage the dough from rising. Just brushing the dough top amply with the herbed oil will impart plenty of herbal aroma and taste. Also, while some of the herbs are optional, do be sure to include the fresh basil, chives, and thyme.
Dough
3 1/4 cups (16.5 ounces) all-purpose flour, plus more if needed
3 teaspoons sea salt, divided
1 teaspoon “rapid rise,” “quick-rise,” “bread machine” or “instant,” yeast
Generous 1 1/3 cups ice water (stir cold water with 1 cup ice cubes for 20 seconds before measuring), plus more ice water if needed
3 tablespoons olive oil, plus more as needed
 Herbed Topping and Dipping Oil
1/3 cup good quality olive oil
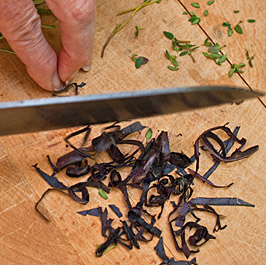
3 to 4 tablespoons chopped or shredded (or chiffonade cut as in photo at right) fresh purple or green basil leaves
2 to 3 tablespoons snipped or chopped fresh chives
1 to 2 tablespoons chopped fresh parsley leaves, optional
1 tablespoon fresh thyme leaves (whole leaves pulled from the stems as in photo at right)
1/2 tablespoon chopped fresh oregano leaves
1 /4 teaspoon coarsely ground black pepper
1 to 2 pinches dried hot red pepper flakes, optional
First rise: In a 3 to 4-quart bowl thoroughly stir together the flour, 2 1/2 teaspoons sea salt, and rapid-rising yeast. Vigorously stir in the water, scraping down the bowl and mixing just until the dough is thoroughly blended. Vigorously stir in 3 tablespoons olive oil or work it in with your hands. If the mixture is too dry to blend together smoothly, stir or work in enough more ice water to facilitate mixing and to yield a slightly moist, but not at all runny dough. If the mixture is too wet, stir in enough more flour to firm it slightly. (The dough consistency is right when it forms a slightly stiff mass that slowly over 5 minutes spreads out in the bowl.) Evenly brush the top lightly with more oil. Cover the bowl with nonstick spray-coated plastic wrap. Let rise at cool room temperature (about 70 degrees F) for 12 to 18 hours.
 Meanwhile, ready the herbed topping and dipping oil by stirring or whisking together the oil, basil, chives, parsley (if using), thyme, oregano, black pepper, and hot pepper flakes (if using) in a medium bowl. Cover and set aside.
Second rise: For thin focaccia like that pictured, generously oil two 9- by 13- (or similar) metal baking pans with olive oil; for a thicker focaccia use one 10- by 15-inch (or similar) metal pan. If dividing the dough in half, cut it in two with oiled kitchen shears. Turn the dough out onto the pan(s). Drizzle it with a generous 2 tablespoons of the herbed olive oil; use 1 tablespoon for each pan if baking in two pans. With well-oiled hands, lightly pat and press out the dough until it nearly fills the pan and is evenly thick all over. (If it springs back and resists, let it rest a few minutes and then continue. Or simply stop after it is spread out fairly thin and evenly thick all over.) Using a fork lift out most of the herbs and spread them evenly over the dough top(s). Tent the pan(s) with nonstick foil. Reserve the rest of the herbed oil for serving with the finished focaccia.
Let rise using any of these methods: for a 1 1/2-2 1/2 hour regular rise, let stand at warm (74-75 degrees F) room temperature; for a 1-2 hour accelerated rise, let stand in a turned-off microwave or regular oven along with 1 cup of boiling hot water; or for an extended rise, refrigerate, covered, up to 48 hours, then set out at room temperature. Continue the rise until the dough has almost doubled from the deflated size, a generous 1/2- to 1-inch thick.

With an oiled thumb, make deep indentations, or dimples, all over the dough. If the oil is standing in little pools, tip the pan(s) from side to side until it is evenly dispersed into the dimples. Sprinkle evenly with 1/2 teaspoon sea salt just before baking. (I like to use a pink or red salt for a little extra color, but plain white will do if that’s what you have.)
Baking Preliminaries and Baking: Twenty minutes before baking time, place a rack in the middle of the oven; preheat to 500 degrees F. Also, place a large, heavy flat baking sheet on the oven floor or on the rack just above the oven coils. Reduce the temperature to 450 degrees F. Immediately place the pan(s) of dough on the preheated pan; put it on the middle oven rack. Bake for 10 to 12 minutes, then rotate the pan and bake 6 to 12 minutes more or until light golden brown all over.
Serve directly from the pan(s) or lift the focaccia slab onto a board and serve from it. Set out the remaining herbed olive oil to serve as an optional dipping oil. The focaccia is best when fresh: cut into rectangles and serve warm or at room temperature.
Keeps, draped with a tea towel, at cool room temperature for 2-3 days.
It may be frozen, airtight, for up to 2 months, but should be crisped in
a preheated 400-degree F oven before serving.
Yield: 12 to 24 servings.
Another bread you might like–my no-knead whole wheat-bulgur pot boule.
Or perhaps you’re interested in my very popular crusty white pot boule from Kneadlessly Simple.
Or for a complete change of pace, try my kneadless chile-cheese bread loaf. 

Hope the recipe was a hit!
I have a special pasta recipe for this weekend , and this foccacia bread recipe is the perfect match! Thanks. 🙂
Nancy, you are my hero! I hope to make this very soon.
Thanks, Jamie–great to have you weigh in. Yes, I always like to point out that no-knead doesn't mean that the bread has poor gluten development. Many think the bread will have an inferior texture or taste–not true at all the "kneadlessly simple" method because it's designed to deliver both. I keep saying I'll go back to the kneading way, but somehow I just never do!
Nancy, what a beautiful, mouthwatering focaccia! And I will so be trying your no-knead version of Nick's already amazing recipe. Your explanation is fascinating – something I am so interested in understanding yet never took the time to read through. Perfect. And how perfect is your focaccia? And I love how such a small world it is that we all know each other and can share moments like this. xoxo
Ina, I have fixed the omission. Barbara, I like to knead bread also. I just like this method because I can do it when I only have little chunks of time here and there and cam keep on with all the other things happening! The method is great if you are doing a lot of coming and going and can't stay home and tend bread!
I love knead knead recipes. Your focaccia does look irresistible.
Your recipe looks fantastic. Since i measure flour by weight, I noticed that the ounces conversion has been left blank. A "fix" would be appreciated.
Thanks,
Ina
Glad to hear this post was useful. Many people expect that "no-knead," will mean poor gluten development and texture, but with the long, cool rise approach this is not the case. Sometimes, it is even better in texture than hand-kneaded dough!
There is so much of good info for beginners like me. Thank you! Hope to make the Kneadless Foccacia very soon 🙂
I am so happy you joined us baking focaccia this month, dear Nancy. Your crisp focaccia looks fantastic. I love the ease of the kneadless version and can't wait to give it a go for my next focaccia. Beautifully done:)
Cynthia, wow–that's so nice to hear. I put my basil in about 3 weeks ago, but got plants that were large enough that I could steal a few leaves now. I just think the purple ones add so much drama!
Nancy, this is another winner. It is now officially past the last frost date for our zone, so I will be getting my basil in the garden tomorrow. And soon there after I will be doing some focaccia baking. My sage, mint, marjoram, made it through the winter unscathed.
Thank you for your interest and support. Delighted that I had the time right now to participate–not always the case, but I will try to on a regular basis. Infusing the oil with herbs and coating the herbs with oil makes a huge difference.
Hi Nancy, So lovely to have you breaking bread with us this month. Love the kneadless method and that you infused the oil with the herbs before spreading. We are truly honored! Shulie