Beautiful Easter Eggs with All-Natural Vegetable Dyes
Beautiful Easter Eggs the Natural Way
by Nancy Baggett
I have been dyeing and hunting Easter eggs with my family since my siblings and I were barely school-age. Once we were grown and my sister’s children and my son were young, if we couldn’t spend Easter together, we’d gather for our egg dyeing and hunting party as soon afterwards as we could. Sometimes our egg ritual didn’t happen till mid-summer—which the kids thought was both funny and fun!
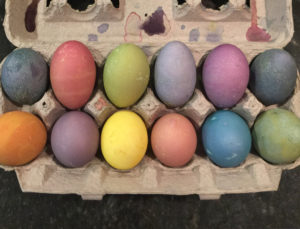
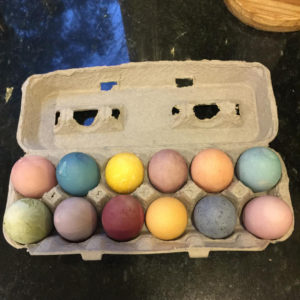
Over the years since I’ve been experimenting with using vegetable and fruit pigments to replace commercial petrochemical food dyes in my kitchen. After trying out numerous homemade botanical egg dye formulas to find the best options, I’ve settled on four simple dye pigments—from red cabbage, beets, blueberries and turmeric—that individually and mixed together produce seven different, very attractive dyes. Yes, these require longer soaks and deliver slightly softer, less stable hues than synthetic dyes. (Eggs tinted with beet juice, for example, gradually fade from bright dusty rose to dusty pink.) Also, the natural pigments, especially blueberry, tend to cover unevenly, lending eggs a mottled, handcrafted look. But isn’t homespun part of the charm of natural dyes?!
I think an even greater part of the appeal is that using these beautiful botanical color pigments (called anthocyanins) helps keep us connected to the natural world. Turning ordinary plants and common foodstuffs into a set of handsome dyes feels elemental and empowering. Blending together primary colors red and yellow and instantly getting (secondary color) orange, or mixing blue and red and getting purple offers a quick refresher course on the seemingly miraculous fundamentals of color science.
The egg dying process also always provides an amazing little biochemistry lesson! It’s hard to believe your eyes when eggs lifted from a decidedly reddish-purple cabbage dye bath turn …. bright blue! This apparent magic occurs because red cabbage contains a unique pH-sensitive anthocyanin pigment called flavin. Just like litmus paper, flavin turns red in the presence of acid and blue in the presence of a base. Since egg shells are mostly calcium carbonate, they are alkaline, or basic; the flavin pigments immediately react to this by turning blue. Another chemistry factoid: Vinegar gets added to dyes because its acid begins breaking down the calcium carbonate—which, in turn, enables the color pigments to more readily adhere to the shells.
Steps for coloring eggs with the following natural dyes:
>For most attractive results use white eggs. Hard-boil them following the directions below. If readying them ahead, let return to room temperature before dyeing begins.
>At dyeing time set out 7 heat-proof cups, jelly jars, or sturdy drinking glasses, each large enough to hold one egg covered with two-thirds cup liquid. Follow the instructions below for creating the 7 color baths. If necessary, reheat the dye baths to hot before using.
>Soak eggs in their bath at least 10 to 15 minutes and up to 20 or 30 minutes for a brighter shade. Eggs take on color more quickly in a hot or warm bath and sometimes multiple dunkings in the same bath speeds the dyeing process. Colors may change color or seem brighter once eggs fully dry. They may gradually fade slightly after a few days.
>For a long dye soaking, put an egg in its bath and refrigerate for a few hours or even overnight. Sometimes this produces very intense colors, but with botanical dyes results are unpredictable—so keep your expectations in check!
>For unusual, one-of-a-kind colors, start eggs in one bath, then switch them to another one or two to produce a “designer” shade. For example, a pale purple egg will slowly turn mauve in a red bath, and a light moss green egg will turn chartreuse with an extended soak in a yellow bath. Enjoy experimenting to produce the broadest array of interesting colors.
> Remove finished eggs from their bath using a slotted spoon. Shake off, and if particles (particularly from turmeric or blueberry) are clinging to the shell, very gently rinse or pat them off with a damp paper towel. Let eggs dry sitting over a slot in the egg carton or on a drying rack.
>Note that natural dyes gradually lose their potency as their color pigments are drawn off and tint the shells. As a result, be prepared for less intensely-hued eggs as you reuse baths. Made as directed below, this set of dyes should deliver pleasing results for about 2 dozen eggs.
>Often, these dyes produce a matte or low-gloss finish. If you like, add luster by rubbing the fully dried eggs with a paper towel dabbed with vegetable oil.
>Promptly refrigerate dyed hard-boiled eggs for up to a week. The colors hold up best when the eggs are kept out of bright light, so their cartons made good storage containers.
To hard-boil eggs: Place eggs in a heavy pot or saucepan large enough to hold them in a single layer. Cover them with 1 inch cold water. Bring just to a full boil over medium heat. Remove pot from burner. Cover it, then let eggs stand in hot water 12 or 13 minutes (15 minutes for extra large eggs). Remove eggs from water; let stand until cool enough to handle. Dye eggs immediately, or cool completely under cool running water and refrigerate for up to 4 days. Bring eggs back to room temperature before using.
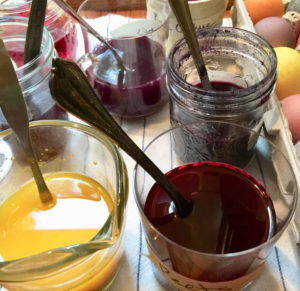
Preparing primary dyes: Start by readying four primary color dyes—red from beets, yellow from turmeric, and two blues, a greenish-blue from cabbage and purplish- or grayish-blue from freeze-dried blueberry powder. Make these several days ahead if desired; keep refrigerated. When ready to begin dyeing, follow directions below for creating three additional secondary colors—purple, orange and green—by mixing together amounts of the primary color dyes.
Red Cabbage Dye: In a very large saucepan combine 4 cups chopped red cabbage (about a 1-pound head , untrimmed) and 1 1/2 cups water. Bring to a boil over high heat, then cover and gently boil for 15 to 20 minutes, until cabbage is tender when pierced. Strain cabbage juice through a fine mesh sieve, pressing down to extract as much juice as possible. Yield should be at least 1 1/3 cups juice; add water if necessary to yield that amount. Stir in 1 1/2 tablespoons white vinegar. Save drained cabbage for eating as a side or in salads.
Color results: Variable shades, from medium greenish-blue to turquoise to deep true blue.
Blueberry Dye: In a large microwave-safe bowl, thoroughly stir together 3 tablespoons freeze-dried blueberry powder and 1 cup water. Cover with a microwave-safe cover and microwave on high power 3 minutes, stopping and stirring after each minute. Let container stand until cooled to warm. Strain blueberry juice through a fine mesh sieve into a 1-cup measure, pressing down extract as much juice as possible. Yield should be at least 2/3 cup juice; add water if necessary. Stir in 1 1/2 tablespoons white vinegar.
Color results: Produces a pale to denim blue to medium blue to dark blue; often lends a mottled appearance, occasionally coats shells with tiny crystals.
Red Beet Dye: Combine 4 cups (about 1 pound untrimmed beets) washed, trimmed, peeled and chopped fresh red beets and 3/4 cup water in a very large microwave-safe bowl. Cover and microwave on high power, stopping and stirring every 3 minutes, until beets are tender when pierced, about 9 minutes. Let stand to cool slightly; handle container using an oven mitt as it will be hot. Strain beet juice through a fine sieve into a 2-cup measure, pressing down to extract as much juice as possible. If you have less than 1 1/3 cups beet juice, add enough water to yield 1 1/3 cups. Stir in 1 1/2 tablespoons white vinegar. Save drained beets for eating as a side or in salads.
Alternatively create beet dye using beet powder as follows: Thoroughly stir together 3 1/2 tablespoons freeze-dried beet (aka beetroot) powder and 1 1/3 cups water in a large microwave-safe bowl. Cover with a microwave-safe cover and microwave on high power 3 minutes, stopping and stirring after each minute. Let container stand until cooled to warm. Strain beet juice through a fine mesh sieve into a 2-cup measure, pressing down to extract as much juice as possible. Yield should be at least 1 1/3 cups juice; add water as necessary. Stir in 1 1/2 tablespoons white vinegar.
Color results: Light to medium to dark dusty rose that gradually fades. Dye readied with beet powder may produce a more brick-colored shade.
Turmeric Dye: In a large microwave-safe bowl thoroughly stir together 1 1/4 cups water and 1/3 cup ground turmeric until well blended and free of lumps. Cover and microwave on high power for 2 minutes. Stop and stir, then microwave on high 2 minutes longer. Let cool slightly. Yield should be 1 1/3 cups dye; do not strain out turmeric powder. Stir in 1 1/2 tablespoons white vinegar. It’s normal for mixture thicken and turmeric to gradually fall to bottom; stir frequently during dyeing to keep powder and water blended.
Color results: Usually pale to medium yellow, requiring at least a 15-minute soak. Some turmeric brands produce a slightly deeper mustard shade.
To ready all dye baths for dyeing: If necessary, reheat dyes until hot but not boiling. Put 2/3 cup beet dye in a dyeing cup; 2/3 cup (blue-producing) red cabbage dye in a second cup; 2/3 cup turmeric dye in a third cup and 2/3 cup blueberry dye in a fourth cup. Then put 1/3 cup red beet dye and 1/3 cup yellow turmeric dye in a fifth cup to create orange dye; 1/3 cup red beet dye and1/3 cup blue-producing red cabbage dye in a sixth cup to create purple dye; and 1/3 cup yellow turmeric dye and 1/3 cup blue-producing red cabbage dye in a seventh cup to create a green dye.
Next, put an egg in each cup, and let the dyeing begin! A great way to store the eggs is in, yes, a cardboard egg carton. Enjoy!


Leave a Reply