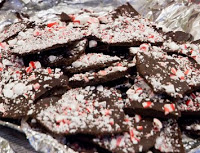
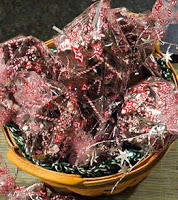
I haven’t been able to pinpoint when peppermint bark came on the scene, but it’s definitely a modern candy. I looked through all my chocolate and confectionary books, and Elaine Gonzolaz’s The Art of Chocolate, published in 1998, is the first I found that mentions any kind of bark. Elaine suggested that dried fruit, nuts, coconut, and even dry cereal could be folded into melted tempered chocolate to create a bark. But she said nothing about adding crushed peppermint, so it must not have been the rage yet. It seems so much a part of American sweets repertoire now that I included this recipe in my 2005 All-American Dessert Book. I’ve decided to post that recipe on my blog because so many people have asked me for it. (Of course, my book has many other recipes I think you’d enjoy!)
Chocolate bark is easier to make than many candies, but there is one very important trick: You need to very carefully follow the melting and cooling directions in the recipe. This will ensure that the chocolate sets up quickly and has a smooth, crisp texture and sheen. Confectioners call this process tempering, and while it’s not hard to do, it can’t be skipped. Otherwise the chocolate may come out crumbly, blotchy, or streaked.
The reason chocolate must be tempered is that it’s chemically complex. Basically, tempering ensures that melted chocolate cools and hardens before the natural white fat, cocoa butter can rise to the surface and look streaky. Additionally, adding some unmelted chocolate to the bowl near the end of mixing “seeds the batch.” This encourages the cocoa butter to set with the most desirable of six different crystal forms, specifically the one that makes it smooth, hard and set at room temperature. (I’ve just built the quick tempering process right into the recipe, so all you have to do is follow the necessary steps.)
Chocolate-Peppermint Bark
Note that chocolate melts at lower than human body temperature, and will scorch if exposed to very high heat. Also, melted chocolate doesn’t mix readily with tiny amounts of liquids. So, don’t be tempted to add peppermint extract or any other liquid to the melted chocolate, as this may cause the chocolate to suddenly harden. If you want an extra hit of peppermint flavor (it isn’t really necessary), you can add some oil of peppermint. (It’s often stocked with candy making and cake decorating supplies in discount department stores and gourmet shops.)
Broken-up candy canes, peppermint sticks, or red and white peppermint hard candies will all work well in this recipe.
To conveniently ready the candy: Place unwrapped candies or broken-up sticks or cane pieces in a triple layer of heavy plastic bags, closing the bags tightly. Using a kitchen mallet or the back of a heavy spoon, whack the candy into 1/8-inch or finer pieces (larger pieces will be too hard on the teeth).
If you like, the bark recipe may be doubled. Follow the directions at the end.
Tip: You don’t need a candy thermometer or other special equipment for this recipe. However, if a cooking or common household thermometer that registers 88 to 90 degrees F. is on hand, use it to check the chocolate temperature. If no thermometer is available, use the touch test provided in the recipe below.
About 1 pound 6 ounces semisweet or bittersweet (not unsweetened) chocolate, divided
1 tablespoon corn oil or other flavorless vegetable oil
2 to 3 drops oil of peppermint, optional
1/2 to 2/3 cup (about 4 1/2 ounces) crushed peppermint pinwheel hard candy or candy canes
Line a 10- by 15-inch (or similar) rimmed tray or baking sheet with aluminum foil; allow the foil to overlap on the narrow ends by 11/2 inches and try not to wrinkle the foil.Break up or chop 1 pound chocolate into small chunks; leave the remaining 6 ounces whole.
In a medium microwave-safe bowl, microwave the chopped chocolate and oil on 100-percent power for 1 minute. Stop and stir. Continue microwaving on 50 percent power, stopping and stirring every 30 seconds until most of the chocolate is melted. (Alternatively, heat the chopped chocolate and oil in a heavy, medium saucepan over lowest heat. Stir and watch carefully until most of the pieces are melted. Immediately remove the pan from the heat.
Transfer the chocolate to a medium bowl.) Continue stirring until the chocolate completely melts, about 5 minutes longer. Stir in the peppermint oil ( if using) and 4 ounces unchopped chocolate until it melts and the mixture is almost cool to the touch. To judge the warmth, insert a thermometer in the deepest part of the bowl. Wait 30 seconds, then check for 89 or lower degrees F. (Alternatively, touch the chocolate stirring spoon to just above your upper lip; the melted mixture should feel almost cool.) If some chunks remain unmelted when the desired temperature is reached, just push them to one side. If the added pieces have completely melted and the mixture is still too warm, stir in the remaining 2 ounces unchopped chocolate and continue cooling down the mixture by stirring.
When the chocolate is cooled enough, lift out any unmelted chunks with a fork and discard. Put the crushed peppermint in a moderately fine sieve or strainer. Hold it over the chocolate and shake back and forth until all the fine peppermint shards drop into the chocolate. Stir well. Remove any peppermint bits larger than 1/8 inch from the strainer and discard (or eat ) them. Reserve the remaining bits in the strainer. Immediately pour the chocolate-peppermint mixture into the prepared tray. Using an off-set spatula or table knife, spread the chocolate out to the edges; be sure the layer is evenly thick. Sprinkle the peppermint left in the strainer evenly over the chocolate. Shake the tray back and forth and rap it on the counter several times to embed the candy bits in the chocolate. Immediately transfer the tray to the refrigerator, resting it flat. Refrigerate for 15 to 20 minutes or until the chocolate is completely set.
Break the bark into 2- to 3-inch irregular pieces. Store airtight at cool room temperature for up to 2 months. Makes about 1 1/3 pounds peppermint bark.
Doubling the Recipe: Follow the basic directions, except ready two 10-by 15- or similar rimmed trays or baking sheets. Break up or chop 2 pounds chocolate into small chunks; have 8 ounces unchopped chocolate on hand. In a large microwave-safe bowl, microwave the chopped chocolate and 2 tablespoons corn oil on 100-percent power for 2 minutes. Stop and stir. Continue microwaving on 50 percent power, stopping and stirring every 30 seconds until most of the chocolate is melted. Continue stirring until the chocolate completely melts. Stir in 4 drops peppermint oil ( if using) and 5 ounces of unchopped chocolate. Proceed as for the original recipe, except if the mixture is still too warm, stir in 3 more ounces unchopped chocolate. Continue exactly as for the original recipe, except divide the recipe evenly between the two pans. Makes about 2 3/4 pounds peppermint bark.


I would just do the chocolate layer as written, then let it cool and harden. Then peel away the foil and turn the choc layer underside up on the foil. I'd then ready the white choc and quickly spread it out over the underside of the dark choc layer, quickly sprinkling over crushed peppermint before the white layer sets.
The only tricks–you may want to make the choc layer thinner, since you'll be adding a second layer. Also, you'll have to be very careful melting the white choc as it scorches easily. You may need to add more vegetable oil than is called for to get it fluid enough for easy spreading–I don't know, because I don't work with white choc all that much, plus brands of it vary greatly. Let me know how it goes–I may want to update my recipe in the future!
Hi Nancy,
Do you have any advice for adding a white chocolate layer to the bark as well, a la Williams Sonoma's famous peppermint bark? That's the stuff my family clamors for and I'd sure love to approximate it in a homemade version. (The WS stuff is awfully good, but oh-so expensive; I'm not buying any of it this year!) I do have peppermint oil on hand. I'm just wondering if you have any words of wisdom before I fiddle with the addition of a top layer of white chocolate. What are your thoughts?
Many thanks,
Jane
Thanks so much for commenting–yes, those are always popular and I like the look, too. And for some reason, they are new to a lot of people, so often turn out to be a nice surprise.
Happy Holidays (and happy baking!)!
Not a comment about peppermint bark, just wanted to say your cranberry-orange pecan white chocolate cookies are the best! Love the cinnamon, orange, fresh cranberry combo along with all the other ingredients. Out of everything I've baked this month, my husband likes them most. Thank you!