• Skip to primary navigation
  • Skip to main content
  • Skip to primary sidebar
  • Skip to secondary sidebar

KitchenLane

Original, well-tested recipes, enticing photos, and helpful cookbook writing how-tos

  • Home
  • meet nancy
  • Blog
  • news and events
  • The Art of Cooking with Lavender
  • articles
  • recipe archives
  • cookbooks
  • reviews
  • Newsletter
  • videos
  • contact
  • New Lavender Cookbook
  • Connecticut Attorney’s Polish Client Snatched from His Car

Kneadlessly Simple Cheese and Chiles Bread–Crusty Bread That Doesn’t Require a Pot

February 16, 2011 By Nancy Baggett 8 Comments

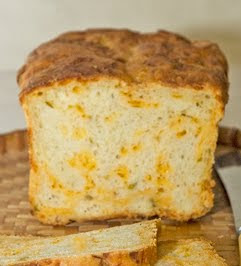
If “no-knead” makes you think only of the rustic white “pot” bread that appeared in the New York Times several years ago, you may be surprised that some no-knead breads don’t require a pot at all! My Cheese and Chiles bread (pic here, recipe below) is one the “kneadless,” breads in my Kneadlessly Simple book that requires no baking pot. And the best news–it comes out delightfully crusty. (It is a fab choice to serve with chili btw!)

Leit’es Culinaria Testers’ Choice (Jennifer Piercy) says about the recipe: “This bread was awesome! I haven’t always had the best luck with no-knead breads, but this one turned out great, with a good crust and crumb. Easy to make and easy to customize. Highly recommended.”


A number of other breads in my Kneadlessly Simple cookbook are also readied in loaf pans and come out looking like traditionally made sandwich-style loaves. But make no mistake–they are not made the “traditional” kneading way!

First, directions simply call for stirring all the dry ingredients, including the yeast, together in a big bowl. Next, cold water (yes, that’s right, ice cold!) is mixed in with a spoon just until a stirrable, but stiff dough forms. Then, the bowl just sits there over many hours, during which time the bubbling yeast actually kneads the dough very thoroughly. The next step is to stir down the dough, adding in the cheese or any other extras, called for. Finally, the dough gets turned out into the loaf pan until it rises again and is ready to bake.

The advantages of the Kneadlessly Simple method over the “traditional” approach:

> The dough gets mixed in and rises in a single bowl, greatly minimizing clean-up.
> All kneading is skipped, eliminating the usual effort and counter-top mess.
> The long, slow “self-kneading” process not only produces great texture but develops rich flavor normally only found in true artisan loaves.
> You don’t need to know how to knead, shape dough, or worry about “proofing” the yeast.
> You don’t need to stick around waiting for the rising to complete; while the dough “does its thing” for 12 to 18 hours, you can go off to bed, or to work, or to play.
> The long rising time is very flexible, allowing you to actually “hold” the dough for significant periods and fit it in when you’re available.

If you haven’t the expertise or the time to spend fiddling with dough all day, this method will probably seem like a godsend. I’ll admit, though, that if you actually prefer the old-fashioned way of setting aside a day and completing your bread straight through from start to finish, this may not really suit your style. Kneadlessly Simple breads take almost no effort or baking skill, but they do require a long, slow, unhurried rise. It’s the secret to their exceptionally good texture and taste.

In a survey conducted for Fleischmann’s yeast of their customers who had tried a sampling of my Kneadlessly Simple recipes, nearly 90 percent said they were “very satisfied,” or “satisfied,” and a whopping 97.9 percent said they would use the recipes again. So, while my kneadless method isn’t for everybody, it comes pretty close. BTW, the Cheddar & Chiles bread, below, was one the breads made by those surveyed. (Check out another of my kneadless loaf pan recipes from the book, an easy oat bread. Or see my Peasant Style Pot Bread that’s similar to the one that appeared in the New York Times.)
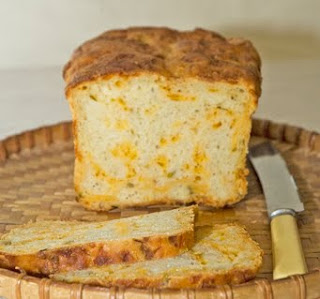
Cheddar & Chiles Bread
Instead of introducing this bread myself, I’m going to let a tester from the Leite’s Culinaria site do the talking for me. I’d be embarrassed to praise it so highly myself, but am perfectly happy to share other folks’ rave reviews!

Leite’s Culinaria Testers’ Choice (Duane DeMello) says: This loaf of bread was without exception the best I have ever made. I took the long route of ten hours in the fridge, followed by a 15-hour cool rise. For the second rise, I went for 20 hours in the fridge. The result was a dough standing 3/4 of an inch above the top of the loaf pan. Upon baking, it rose another 3/4 inch, finishing with beautiful overhanging edges on each side. The taste was superb and the crunchiness of the crust, on all sides, likewise, was wonderful.

3 1/2 cups (17.5 ounces) unbleached white bread flour, plus more as needed
1 tablespoon granulated sugar
1 3/4 teaspoons table salt
1 teaspoon instant, fast-rising, or bread machine yeast
2 tablespoons corn oil, canola oil, or other flavorless vegetable oil, plus extra for coating dough top and baking pan
1 2/3 cups ice water, plus more if needed
8 ounces (3 lightly packed cups) coarsely grated very sharp cheddar cheese
1/2 cup very well-drained and patted dry chopped canned green chiles

First rise: In a large bowl, thoroughly stir together the flour, sugar, salt and yeast. In another bowl or measuring cup, whisk the oil into the water. Thoroughly stir the mixture into the bowl with the flour, scraping down the sides until the ingredients are thoroughly blended. If the mixture is too dry to incorporate all the flour, a bit at a time, stir in just enough more ice water to blend the ingredients; don’t over-moisten, as the dough should be stiff enough to hold its shape. If necessary, stir in enough more flour to stiffen it.
Brush or spray the top with oil. Cover the bowl with plastic wrap. If desired, for best flavor or for convenience, you can refrigerate the dough for 3 to 10 hours; this is optional. Then let rise at cool room temperature for 15 to 20 hours; this is required.

Second rise: Vigorously stir the dough, gradually sprinkling over and incorporating the cheese and chiles. Fold them in very thoroughly to ensure they are evenly distributed. If necessary, thoroughly stir in enough more flour to yield a very stiff dough. Invert the dough into a well-greased 9 x 5-inch loaf pan. Evenly brush or spray the dough top with oil. Using well-oiled kitchen shears or a serrated knife, make a [1/4]-inch deep slash lengthwise down the center of the loaf. Cover the pan with nonstick spray-coated plastic wrap.
Let rise using any of these methods: for a 11/2- to 21/2-hour regular rise, let stand at warm room temperature; for a 1- to 2-hour accelerated rise, let stand in a turned-off microwave along with 1 cup of boiling-hot water; or for an extended rise, refrigerate for 4 to 24 hours, then set out at room temperature. Continue the rise until the dough nears the plastic. Remove it and continue until the dough reaches 1/2 inch above the pan rim.

Baking Preliminaries: 15 minutes before baking time, place a rack in the lower third of the oven; preheat to 425 degree F.
Baking: Bake for 30 to 40 minutes, or until the top is nicely browned. Cover the top with foil and continue baking 20 to 30 minutes longer, or until a skewer inserted in the thickest part comes out with just a few particles clinging to the bottom (or until the center registers 203 to 204 degrees F on an instant-read thermometer). Then bake for 5 minutes more to be sure the center is done. Cool in the pan on a wire rack for 10 minutes. Turn out the loaf onto the rack; cool thoroughly.
Yield: 1 large loaf, about 12 to 14 slices each.
Serving and Storing: Cool thoroughly before slicing or storing. Store air tight in plastic or aluminum foil. The bread will keep at room temperature for 2 to 3 days, and may be frozen, airtight, for up to 2 months.
Print Friendly, PDF & Email
FacebooktwitterredditpinterestlinkedintumblrmailFacebooktwitterredditpinterestlinkedintumblrmail

Filed Under: Uncategorized Tagged With: crusty no-knead cheddar bread, no-knead bread, no-knead cheddar and chiles bread, no-knead cheese bread

Previous Post: « 7 Steps to Tastier Food Writing
Next Post: Leite’s Culinaria is Having a Birthday! So I Baked a (Chocolate-Glazed Banana) Bundt Cake »

Reader Interactions

Comments

  1. Nancy Baggett says

    February 21, 2011 at 9:39 pm

    Woo hoo! Glad it worked out so well. Yes, you can definitely make two smaller loaves–you'll just have to fiddle with the baking time. (You could freeze the second loaf–if it doesn't disappear too fast to need freezing!)

  2. Margie says

    February 20, 2011 at 11:45 pm

    The bread was wonderful. Think it's the best bread I've ever made.
    I used the all-purpose light wheat bread recipe. I substituted KA white-wheat for regular wheat flour, and it worked beautifully.
    Think that next time I'll bake it in two smaller pans, so it won't need to stay in the oven so long.
    I don't want to mess it up, though.
    You thoughts on using smaller pans?
    I got the book from the library to give it a test run, but will definitely be buying it.
    Thanks for showing us how to make bread so easily and simply.

  3. Nancy Baggett says

    February 20, 2011 at 6:51 pm

    Oh, boy, sounds good, Margie. Yes, these are not batter breads, so once the first "bubbling" rise is done, it's best to stiffen up the dough before the second rise, if necessary. Would love to hear what you made and the final results.

  4. Margie says

    February 20, 2011 at 2:03 pm

    My first loaf of bread from your book is now in the second rise.
    I was worried that the dough wasn't stiff enough; so I added more flour, as you suggested.
    In a couple of hours, I'll be enjoying warm bread with butter and home-made plum jelly. Oh, yum!

  5. Megan @ FeastingonArt says

    February 20, 2011 at 3:03 am

    This bread looks delish! Chilies and cheese, two of my favorites.

  6. sarah says

    February 19, 2011 at 3:28 pm

    Ah, that sounds fantastic! Whole wheat would surely require a lot of testing, so thanks for putting in the time to get it right. I recently tried the fast whole wheat bread from King Arthur Flour and it's pretty inventive, too.

    "Crunchy-Munchy Pumpkin" makes me giggle. 🙂 Genius!

  7. Nancy Baggett says

    February 19, 2011 at 2:51 pm

    Oh,yes, I have a whole chapter of breads that are mostly whole grain, including one that's 100 percent whole wheat–it took a lot of testing to get it right. Plus, there are other recipes throughout that are multigrain or seeded multigrain. One of my faves is called Crunchy-Munchy Pumpkin, Sunflower and Flax Seed Boule!
    The method is versatile & unique–I really wanted one that would enable even super busy folks and bread novices to bake good bread whenever they liked.

  8. sarah says

    February 19, 2011 at 2:15 pm

    Nancy, this sounds like a very versatile and innovative recipe! I wonder if any of the breads in your book are made with whole grain flour? That would definitely draw me in even more…

Leave a Reply

Your email address will not be published. Required fields are marked *

Primary Sidebar

  • Email
  • Facebook
  • Instagram
  • LinkedIn
  • Pinterest
  • RSS
  • Twitter

Welcome to KitchenLane! It’s a comfortable place where I create, thoroughly test, and photograph recipes for my cookbooks and blog. All my recipes are original, not adaptations from others. I trained as a pastry chef, so many offerings are desserts and baked goods. Some are also healthful, savory dishes I contribute to healthy eating publications. My recipes are always free of artificial dyes, flavorings, and other iffy additives, which I won’t serve my family—or you! Instead, dishes feature naturally flavorful, colorful ingredients including fresh herbs, berries, edible flowers, and fruits, many from my own suburban garden or local farmers’ markets. Since lots of readers aspire to write cookbooks, I also blog on recipe writing and editing and other helpful publishing how-to info accumulated while authoring nearly 20 well-received cookbooks over many years.


The Art of Cooking with Lavender

The Art of Cooking with Lavender
 

The 2 Day A Week Diet Cookbook

Now available on Amazon! The 2 Day a Week Diet Cookbook
75 Recipes & 50 Photos
 

SIMPLY SENSATIONAL COOKIES

Simply Sensational Cookies
Visit the book page.
 

KNEADLESSLY SIMPLE

Kneadlessly Simple
Visit the book page

The All-American Dessert Book

The All-American Dessert Book
Visit the book page

The All-American Cookie Book

The All-American Cookie Book
 

Nancy Baggett’s Food Network Gingerbread Demo!

Watch demo HERE. Find Cookie Recipe HERE.

Secondary Sidebar

Archives

Kitchen Lane Trailer

Nasturtium Recipes & Quick Tricks

Nasturtium Recipes & Quick Tricks

Violet Quick Tips

Violet Quick Tips

Fun, Easy Cookie Decorating with Marbling

Fun, Easy Cookie Decorating with Marbling

Pretty Piping with Only a Baggie

Pretty Piping with Only a Baggie

Latest Video – Pretty Daisy Cookies

Pretty Daisy Cookies

Fun, Quick Cooking Baking with the Kids Video

Fun, Quick Cooking Baking with the Kids Video

The Best Way to Roll Out Cookie Dough

The Best Way to Roll Out Cookie Dough

The Best Way to Roll Out Cookie Dough

- Part 2 -

Best Tips for Cutting Out Cookies

Featured Bread Recipe and Video

Featured Bread Recipe and Video

Most Popular Posts

Getting to Yes on Foodgawker and Tastespotting (My Six-Month Journey, Plus Tips)

Strawberry-Rhubarb Freezer Jam–Spring in Every Jar

The Kneadlessly Simple Crusty White Pot Bread

Featured Bread Recipe and Video

Copyright © 2025 · Nancy Baggett's Kitchenlane. All material on this website is copyrighted and may not be reused without the permission of Nancy Baggett.