
 Chocolate bark is easier to make than many candies, but there is one very important trick that a lot of the recipes circulating around don’t tell you: You need to very carefully follow certain chocolate melting and cooling directions. This will ensure that the chocolate sets up quickly and has a smooth, crisp texture and sheen. Confectioners call this process tempering, and while it’s not hard to do, it can’t be skipped. Otherwise the chocolate may come out crumbly, blotchy, or streaked.
 Chocolate melts at lower than human body temperature, and will scorch if exposed to very high heat, so warm it gently. Also, melted chocolate doesn’t mix readily with tiny amounts of liquids. So, don’t add peppermint extract or any other liquid to the melted chocolate, as this may cause the chocolate to suddenly harden. (A few drops of peppermint oil, on the other hand, can be added.)
Tip: You don’t have to have a candy thermometer or other special equipment for this recipe. However, if a cooking or common household thermometer that registers 88 to 90 degrees F. is on hand, use it to check the chocolate temperature. If no thermometer is available, use the touch test provided in the recipe below.One more thing: If the chocolate drops down below 88 degrees F and starts to set, you may need to warm it again just slightly. Otherwise, the peppermint bits will hit the hard surface and fall off rather than sticking as they should. If the mixture is still in the stirring bowl, simply return it to the microwave and nuke it 2 or 3 seconds, then stir thoroughly. If the mixture is already spread out in the baking sheets, warm it in a low oven for a minute or two–watch carefully as you want only the surface to be tacky, not the whole layer to melt.
About 1 pound 6 ounces semisweet or bittersweet (not unsweetened) chocolate or white chocolate, divided
1 tablespoon corn oil or other flavorless vegetable oil
2 to 3 drops oil of peppermint, optional
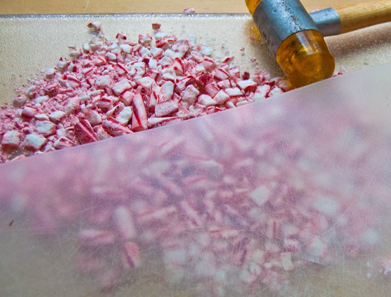
1/2 to 3/4 cup (about 4 1/2 to 5 ounces) crushed peppermint pinwheel hard candy or candy canes
Line a 10- by 15-inch (or similar) rimmed tray or baking sheet with aluminum foil; allow the foil to overlap on the narrow ends by 1 1/2 inches and try not to wrinkle the foil. Break up or chop 1 pound chocolate into small chunks; leave the remaining 6 ounces whole.

In a medium-size microwave-safe bowl, microwave the chopped chocolate and oil on 100-percent power for 1 minute. Stop and stir. Continue microwaving on 50 percent power, stopping and stirring every 30 seconds until most of the chocolate is melted. (Alternatively, heat the chopped chocolate and oil in a heavy, medium saucepan over lowest heat. Stir and watch carefully until most of the pieces are melted. Immediately remove the pan from the heat.
Transfer the chocolate to another dry, cool bowl. Continue stirring until the chocolate completely melts, about 5 minutes longer. Stir in the peppermint oil ( if using) and 4 ounces unchopped chocolate until it melts and the mixture is almost cool to the touch. To judge the warmth, insert a thermometer in the deepest part of the bowl. Wait 30 seconds, then check for 89 or lower degrees F. (Alternatively, touch the chocolate stirring spoon to just above your upper lip; the melted mixture should feel almost cool.) Keep stirring to cool the mixture if necessary. If some chunks remain unmelted when the desired temperature is reached, just lift them out and them aside. If the added pieces have completely melted and the mixture is still too warm, stir in the remaining 2 ounces unchopped chocolate and continue cooling down the mixture by stirring.
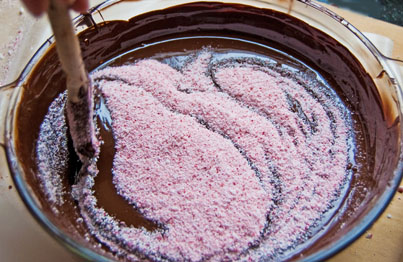
When the chocolate is cooled enough, lift out any unmelted chunks with a fork and discard. Add the previously sifted very fine peppermint shards to the chocolate. Stir well. Reserve the remaining larger bits for garnishing the top.
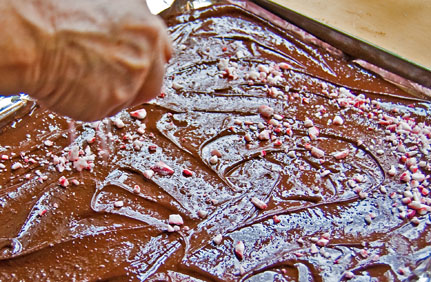
Immediately pour the chocolate-peppermint mixture into the prepared tray. 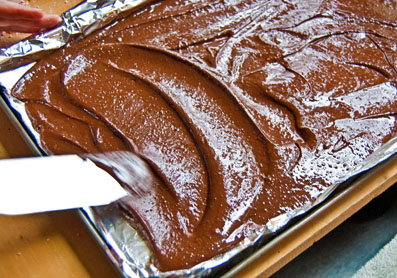 Using an off-set spatula or table knife, spread the chocolate out to the edges; be sure the layer is evenly thick. Sprinkle the reserved peppermint bits evenly over the chocolate. Shake the tray back and forth and rap it on the counter several times to embed the candy bits in the chocolate. Immediately transfer the tray to the refrigerator, resting it flat. Refrigerate for 15 to 20 minutes or until the chocolate is completely set.

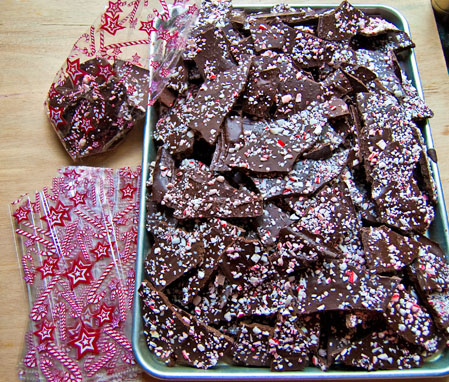
Carefully peel the chocolate bark from the foil as shown below; be sure to remove all bits of foil. Break the bark into 2- to 4-inch irregular pieces with your hands. Package the bark as desired.
Store airtight at cool room temperature for up to 2 months. Makes about 1 1/3 pounds peppermint bark.
Doubling the Recipe: Follow the basic directions, except ready two 10-by 15- or similar rimmed trays or baking sheets. Break up or chop 2 pounds chocolate into small chunks; have 8 ounces unchopped chocolate on hand. In a large microwave-safe bowl, microwave the chopped chocolate and 2 tablespoons corn oil on 100-percent power for 2 minutes. Stop and stir. Continue microwaving on 50 percent power, stopping and stirring every 30 seconds until most of the chocolate is melted. Continue stirring until the chocolate completely melts. Stir in 4 drops peppermint oil ( if using) and 5 ounces of unchopped chocolate. Proceed as for the original recipe, except if the mixture is still too warm, stir in 3 more ounces unchopped chocolate. Continue exactly as for the original recipe, except divide the recipe evenly between the two pans. Makes about 2 3/4 pounds peppermint bark.
Another peppermint recipe you may like–chocolate peppermint brownies. 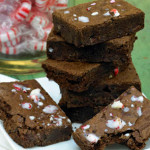

Hi, I am sorry to say that melting will cause the layers to blend together and even worse the heat will cause the chocolate to lose temper and have an ugly look and crumbly texture. I would take a large, sharp knife, dip it in warm water, dry it off, then cut the bark into smallish pieces. Repeat the warming of the knife, then drying it well, and cutting as needed. To make the pieces easy to eat, I would cut them in perhaps 1 by 2″pieces–but that is up to you.
My layers of dark and white chocolate are so thick, I can’t break them apart. Can I do anything to correct this, like melt it in a warm oven and allow it to spread out? Help, please.
Mary B
Samantha, I went and tried to purchase white chocolate with both palm kernel oil and cocoa butter and couldn’t find any! The Lindt “classic recipe” white chocolate contained only cocoa butter. The Ghiradelli “premium baking bar” white chocolate likewise contained NO palm kernel oil. So, I am not able to answer your question. I’d be interested in hearing about your results if you have time to post.
If the chocolate layer did not set up hard it was not really tempered correctly. As I mentioned this step is a bit tricky–chocolate tempering is just challenging even for pros. I am guessing that you just didn’t let it slowly cool down enough before spreading it out in the pan. (The bowl needs to feel cool on the bottom–no warmth, and the top edges may start to set.) If the pan is already cool and you put the finished pan of bark back in a cool spot, a correctly tempered layer will be firm to hard set in less than 10 minutes and no refrigerator is later needed. The other possibility is that the hard, smooth piece of chocolate that was “seeding” the batch–that is, providing the right crystal formation ensuring a hard, glossy set– had all melted and the chocolate set up with a different crystal formation than was needed. Chocolate can actually set in a number of wrong ways–soft as you describe, gritty, blotchy, and crumbly. While I was learning tempering, I “discovered” all these wrong sets. You actually did very well for your first effort!
I made chocolate peppermint bark for the first time and it was delicious but I did something wrong because the semi=sweet chocolate bottom layer was soft and pliable at room temperature. I used Ghirardelli chocolate for both layers. The top white layer was perfect and stayed brittle. The bottom was brittle if I kept it refrigerated but was too soft at room temperature and melted in your hand. I melted it in a double boiler and it melted beautifully and both layers stayed together and did not separate. What did I do wrong?
The two are not incompatible IN a bar of chocolate. However, a white chocolate bar made with palm kernel oil will not “stick” when layered against a dark chocolate made with cocoa butter. The two parts just separate into two layers when handled after completion. I’m sorry to say I don’t know what will happen with a white chocolate made with a combination of cocoa butter AND palm kernel oil, as I have not tried that. Since the cocoa butter is listed first and therefore in a larger proportion, it may be that the two layers will bond together. But I can’t be sure. If you want to try and see, I suggest only trying a small proportion of the white and dark layered. If the two layers come apart once cold and set, then you could just proceed to make a white chocolate bark and a separate dark chocolate bark. If they do stick together, then you could go ahead and make the combo white and dark bark. Now that you’ve brought this up, I’ll try to find some Lindt white chocolate and test this out. But I don’t have time right now, so can’t help you right away. One more thing: It is easier to make just a single layer white or dark bark, so if this is your first attempt you might want to just make a white and a dark instead of doing a two-toned bark. If I were teaching newbies, I’d definitely start with a single color bark first because it’s not as complicated a project.
Just a quick question–I’m really confused about something! You mentioned cocoa butter and palm kernel oil being incompatible, however, I purchased some bars of Lindt White Chocolate for a white & dark chocolate peppermint bark (my first attempt!)…and it contains both cocoa butter and palm kernel oil. Cocoa butter is listed higher on the ingredients list, but if the two are incompatible, how can they both be in the bar?
LOL! My list of bark recipients is long. Domenica. the ship with my dispatches has already sailed! I always wonder about the recipes that don’t require tempering as the chances the bark will come out crumbly and blotchy are good. And as I said, peppermint extract just won’t work in candy–comes out tasting lacking and bitter. Good luck–if you have a candy thermometer the process is actually pretty easy.
I am almost always able to diagnose the problem when peeps have trouble, but I have NEVER had this happen and can’t exactly tell you why the chocolate turned gritty. It sounds as if the sugar in it crystallized, but more likely the chocolate set up with a crystal formation that happens when the tempering isn’t really right. If the chocolate is cooled down to the temp specified and tempered chocolate is being stirred into it until the batch is spread out in the pan, the chocolate sets up hard and glossy within 2 minutes. It is then fixed that way–can be stored at room temp and will not lose its hardness or gloss. I suspect that maybe the bottom layer was not cooled down enough so some gritty crystals began forming and eventually affected the whole layer. Very sorry, but the process is a little tricky–if you use a candy thermometer it is easier to be sure the chocolate is cool enough that it will set in the desired crystal state and not gritty.
My chocolate bottom layer became gritty after a few hours after it was made. It was fine at first but by the next day the semi sweet chocolate became gritty. Help!!!
Oh my, yes I did that myself. Ended up with the two layers just coming apart. And almost nobody even mentions this issue in their instructions!
I sooo wish I had seen and read your blog first. Just yesterday I made a two toned batch that separated. Not gonna use that 'cheap' white chocolate again 😉 Guess I have to make some more now!! 🙂
The 4 ounces left over would have made a difference, so may account for that. Don't worry that the whole pan wasn't covered though–it is better to have the layer too thin than too thick. A thicker layer doesn't cool as quickly, which give the chocolate more time to separate and lose its temper–which you definitely don't want! You know it was in temper if your layer has a sheen and is firm-brittle when you break it into bark.
I made the recipe, its still cooling so don't know if I was successful but using the size pan specified, I came up short on being able to spread it over the whole pan, not enough. The 4 oz I used to cool it mostly stayed in their state so I removed them so maybe that is why it wasn't quite enough?
No, I wouldn't use chocolate morsels. They are specifically designed to hold their shape and not run much when heated, so they would be a bit too stiff to spread out well and form bark. Places that carry cake decorating supplies like the Wilton line (Michael's, Joann's, etc.) often have peppermint oil with the candy-making supplies. But they are often sold out this time of year. Some old-fashioned hardware/home supply stores carry candy making oils also. Or go to LorAnn on-line. (But adding extra oil isn't essential.)
Can you use chocolate chips and where do you find peppermint oil, looked at grocery store and home goods with no luck
Yes, canola would be fine.
Can you use canola oil?
Cedya, I had that happen also, and had no idea what the problem was. It is actually surprising how few people really know about this, as the two layers will definitely come apart if the non cocooa-butter white chocolate is used.
Thank you for your explanation on why the double layers sometimes split… this was very helpful! I've made this many times and never knew why sometimes it worked and sometimes it didn't.
Thank you so much for the great info. I feel so well informed and well armed for our 8th annual Cookie Day!
Really good info–thank you.
How do I get on that list for receiving your peppermint bark?? This looks absolutely delicious, Nancy. But what I really appreciate is your clear instructions. I have always had trouble on the candy front, but reading your instructions makes me think I might be able to pull it off. Thanks for posting this and I wish you a wonderful holiday.