• Skip to primary navigation
  • Skip to main content
  • Skip to primary sidebar
  • Skip to secondary sidebar

KitchenLane

Original, well-tested recipes, enticing photos, and helpful cookbook writing how-tos

  • Home
  • meet nancy
  • Blog
  • news and events
  • The Art of Cooking with Lavender
  • articles
  • recipe archives
  • cookbooks
  • reviews
  • Newsletter
  • videos
  • contact
  • New Lavender Cookbook
  • Connecticut Attorney’s Polish Client Snatched from His Car

How to Use a Marbling Technique to Decorate Valentine’s Cookies, Plus an Icing for All-Natural Food Colors

January 30, 2012 By Nancy Baggett 1 Comment

Recently I posted about my switch from decorating with regular commercial liquid food dyes to all-natural botanical alternatives. I explained here why I think this was a smart health decision and provided a lot of other details.

I promised that I’d follow up with an icing recipe to use with the “naturally beautiful” dyes. In the meantime, I also got an e-mail asking how to create the interesting geometric designs shown on some of these cookies (like most of the ones at left). 

So, I here I show you step-by-step how one very eye-catching effect is created.

The technique is called marbling, and it’s a classic decorating method European pastry chefs have long used to quickly dress up fancy tortes and other pastries. Don’t worry, it’s easier than it looks!

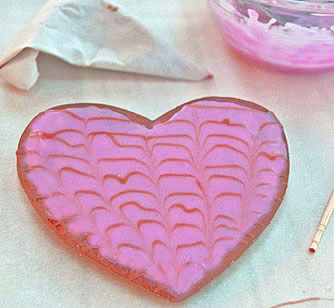
Yes, the marbling can involve using a variety of different colors and very tidy piping (my pink striped cookie in the top left pic features red, brown, lime green and white!). But it doesn’t have to be at all elaborate or even perfectly piped to look impressive.

The main thing to remember is that the designs need to be completed while icings are still wet.  So, it’s best to have everything ready and within reach in advance. The toothpicks should be handy, the icings made, and the accenting icing(s) placed in a piping bag or cone.

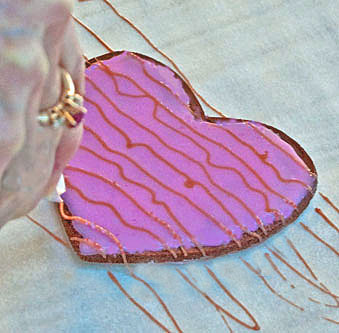
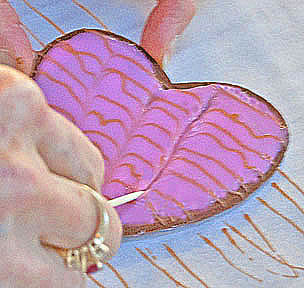
As the four pics at right reveal, the basic technique is fairly simple: After covering a cookie with a fairly fluid icing,  immediately pipe spaced lines in a contrasting color (or colors) over the first layer. You can use a piping bag fitted with a fine writing tip; or a paper decorating cone; or a sturdy plastic baggie with one tiny corner snipped off. Don’t worry if your piped lines aren’t perfect; the finished cookie will still look very impressive!


As soon as the lines are completed, use a toothpick to draw across them to marble the colors and create the geometric design. It may be easiest to start in the middle, then draw down through at regular intervals on each side, as shown at right. It’s also possible to draw through the lines working from the bottom to the top, or by drawing downward with one line, then upward with the next for another interesting look.

In smaller heart cookies three vertical lines is enough to dress up the entire surface. However, five marbling lines looks great on larger cookies. The only real key to success is to finish working while the two icings are still wet enough to blend and flow together and dry with a smooth surface. (If you are curious about how to create the little heart designs on several cookies pictured below, the how-to for this slightly different marbling technique is here.)

As all these pics prove, the “au naturel” dyes come in a nice variety of colors, so cake and cookie decorations can be just as pretty as they ever were. (All those shown were decorated with plant-based dyes from the Natural Colors line sold here.) The botanical food colors do have to be handled a little differently though because they are more prone to fade when exposed to heat, air, and light.  Tint your icings, buttercreams, and such a little brighter than the final shade desired to accommodate for this. And store the bottles of colors tightly capped and in the refrigerator to keep the shades vivid.

Some brands of liquid botanical colors have a slightly thicker consistency than comparable synthetic dyes, partly because of the natural color pigments themselves and partly because the au naturel brands often incorporate plant glycerin instead of the more fluid but risky propylene glycol found in “regular” food dyes.  Propylene glycol is the main ingredient in some kinds of antifreeze!

 Don’t add lemon juice or other fruit juices to flavor icings tinted with botanical colors, as some natural dyes, especially blue shades, react with acid ingredients and immediately turn pink or red! If you really want a lemon, orange or lime flavor, add a couple pinches of very finely grated fresh citrus zest to the icing.
Easy Powdered Sugar Icing for Au Natural Food Colors
Here’s an easy powdered sugar icing suitable for using with botanical dyes (or with regular food colors if that’s what you have).  A double batch of  the same icing was tinted different colors and used to decorate all the cookies pictured. (If you don’t have purchased botanical dyes, you can make pretty cookies using cranberry juice concentrate instead; the recipe is different and is posted here.)
 
You’ll notice that the recipe calls for optional meringue powder or egg white powder.  Add it if you’re working with very bright contrasting colors that you don’t want to bleed into one another as the cookies stand.  Meringue powder can be usually  found with other Wilton cake decorating products.  Plain egg white powder is often stocked in supermarket baking aisles.

By the way, I made the cookies using the Good and Easy Sugar Cookies recipe in Simply Sensational Cookies, but for another a rolled sugar cookie recipe that works well, go here.

 Tip: Don’t leave out the corn syrup—it’s what gives the icing its sheen.
3 cups powdered sugar, divided, plus more as needed
1 tablespoon commercial meringue powder or dried egg white powder, optional
1  1/2 teaspoons light corn syrup, divided
1/2 teaspoon vanilla, almond, lemon, or raspberry extract
5 to 6 teaspoons water, plus more if needed
1 to 2 teaspoons unsweetened cocoa powder combined with enough water to make a smooth paste, optional
Natural botanical food colors (or regular food colors), as desired
Put the powdered sugar in a large bowl. Thoroughly stir in the meringue powder if using. Stir the corn syrup, vanilla, and 5 teaspoons water into the mixture, adding more water if the mixture is too dry to come together smoothly.  Divide the mixture among three or four bowls if you want make an assortment of colors. Stir in botanical or synthetic food colors, as desired.  The natural dyes will fade a bit as they dry and the baked goods are stored, so make them a bit brighter than you want the final shades to be.  For a natural brown color, make a cocoa powder paste and stir it into one of the bowls until thoroughly incorporated. If necessary, thin the icings with more water to make them for fluid and spreadable; or thicken them with powdered sugar until stiff enough to hold their shape when  piped.
Decorating options:
>For rolled cookies–Spread  out a smooth layer of icing  the cookies tops,  then for a marbled  effect  immediately top with a contrasting piped icing as desired. Directions for forming little hearts are here.  Or immediately garnish the tops by adding colored sprinkles or decorator sugar as desired.
>For dropped or mounded cookies, dip their tops into the icing when it is very fluid. Or stiffen the icing with powdered sugar and enough to swirl or pipe onto their tops. 
This recipe is designed so you can make smallish batches of 3 or 4
different colors–bright pink, light pink, chocolate and white. For the
intense pink shown, mix the ingredients with all cranberry juice
concentrate. For a light or medium pink, use about half cranberry juice
concentrate and half water.  For the rich, reddish chocolate color
shown, use mostly cranberry juice concentrate instead of water when you
mix up the icing. By the way, the berry juice adds a very pleasant
fruitiness and tang to the icings. (Of course, for a plain white icing, you simply use all water and omit the juice.)

All
together these batches of icing will yield enough to generously
decorate 40 to 60 cookies, depending on their size. I often decorate a
number of cookies using the medium and bright pink colors, then stir in
some white to tone them down for cookies in additional complementary
slightly softer shades. Both the chocolate and the white contrast the
bright pink nicely. Yield: 1 batch of icing will generously decorate 30 to 40 2 1/2- to 3-inch cookies.

 See how to make marbled heart cookies here.

Check out directions for my “jeweled” stain-glass heart cookies here.

Learn how to make all-natural homemade sprinkles in any color desired here.

Print Friendly, PDF & Email
FacebooktwitterredditpinterestlinkedintumblrmailFacebooktwitterredditpinterestlinkedintumblrmail

Filed Under: Uncategorized Tagged With: all natural cake decorating, au naturel cookie decorating, decorated Valentine's cookies, mabling technique, pastry decorating marbling, pretty heart cookies

Previous Post: « Pastry Decorating the “Naturally Beautiful” Way–How to Avoid Synthetic Food Colors & Use Botanical Dyes
Next Post: Sweets for a Sweetie–Vintage American Valentine’s Cards »

Reader Interactions

Comments

  1. Anonymous says

    February 2, 2012 at 9:36 pm

    looks neat–goning to try it

Leave a Reply

Your email address will not be published. Required fields are marked *

Primary Sidebar

  • Email
  • Facebook
  • Instagram
  • LinkedIn
  • Pinterest
  • RSS
  • Twitter

Welcome to KitchenLane! It’s a comfortable place where I create, thoroughly test, and photograph recipes for my cookbooks and blog. All my recipes are original, not adaptations from others. I trained as a pastry chef, so many offerings are desserts and baked goods. Some are also healthful, savory dishes I contribute to healthy eating publications. My recipes are always free of artificial dyes, flavorings, and other iffy additives, which I won’t serve my family—or you! Instead, dishes feature naturally flavorful, colorful ingredients including fresh herbs, berries, edible flowers, and fruits, many from my own suburban garden or local farmers’ markets. Since lots of readers aspire to write cookbooks, I also blog on recipe writing and editing and other helpful publishing how-to info accumulated while authoring nearly 20 well-received cookbooks over many years.


The Art of Cooking with Lavender

The Art of Cooking with Lavender
 

The 2 Day A Week Diet Cookbook

Now available on Amazon! The 2 Day a Week Diet Cookbook
75 Recipes & 50 Photos
 

SIMPLY SENSATIONAL COOKIES

Simply Sensational Cookies
Visit the book page.
 

KNEADLESSLY SIMPLE

Kneadlessly Simple
Visit the book page

The All-American Dessert Book

The All-American Dessert Book
Visit the book page

The All-American Cookie Book

The All-American Cookie Book
 

Nancy Baggett’s Food Network Gingerbread Demo!

Watch demo HERE. Find Cookie Recipe HERE.

Secondary Sidebar

Archives

Kitchen Lane Trailer

Nasturtium Recipes & Quick Tricks

Nasturtium Recipes & Quick Tricks

Violet Quick Tips

Violet Quick Tips

Fun, Easy Cookie Decorating with Marbling

Fun, Easy Cookie Decorating with Marbling

Pretty Piping with Only a Baggie

Pretty Piping with Only a Baggie

Latest Video – Pretty Daisy Cookies

Pretty Daisy Cookies

Fun, Quick Cooking Baking with the Kids Video

Fun, Quick Cooking Baking with the Kids Video

The Best Way to Roll Out Cookie Dough

The Best Way to Roll Out Cookie Dough

The Best Way to Roll Out Cookie Dough

- Part 2 -

Best Tips for Cutting Out Cookies

Featured Bread Recipe and Video

Featured Bread Recipe and Video

Most Popular Posts

Getting to Yes on Foodgawker and Tastespotting (My Six-Month Journey, Plus Tips)

Strawberry-Rhubarb Freezer Jam–Spring in Every Jar

The Kneadlessly Simple Crusty White Pot Bread

Featured Bread Recipe and Video

Copyright © 2025 · Nancy Baggett's Kitchenlane. All material on this website is copyrighted and may not be reused without the permission of Nancy Baggett.