Yesterday my grandkids and I cut out, baked, and decorated sugar cookies. We’ve been doing this at various holidays ever since my grandson, Charlie, was 18 months old–and he is now almost a teenager! His baby sister, Lizzie, could not stand to be left out, so she started joining in when she was just over a year. (Anything Charlie could do, she had to try to do, too!)
Actually, our cookie sessions are now a favorite family tradition. We have fun making some appealing treats for most holidays, plus we all enjoy the creative, artsy-craftsy decorating part. And, as the children said yesterday, it’s great just to hang out in the kitchen and be together.
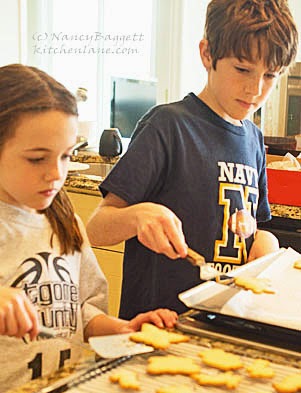
One easy tip I’ve taught the kids is to always lay the larger or thicker cutout cookies around the outside of the baking sheet and the smaller or thinner ones on the inside. This helps ensure that they all get done at once. (The heat reaches the cookies on the outside first, and, being larger, they need the extra baking time.)
Like a lot of kids, Lizzie and Charlie enjoy doing a good bit of cookie and icing tasting during their decorating sessions. This is one reason I prefer to use botanical food colors in the icings and, often, I buy synthetic dye-free colored sprinkles as well. (Allergies run in our family, and synthetic petrochemical food dyes are known to be allergens for some people.)
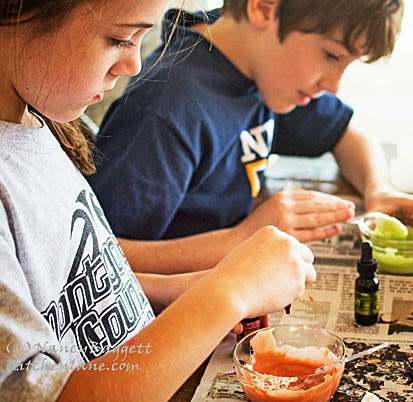
The pic at left shows the children tinting their icings with a line of all natural colorants available online from chocolatecraftcolors; these products, including dyes and sprinkles work very well. Some retailers also sell the India Tree “Natural Color” line of botanical dyes and sprinkles. Sometimes, we use a different icing recipe that features colors from frozen fruit juice concentrates from the supermarket; that recipe is available on my site here. Some cookies using that icing are pictured at the bottom of this post.
In
case you’d like to have a cookie baking session with your favorite kids,
here are some of the logistical details to help things go
smoothly. If you’ve got other tips I don’t mention, please share them in the comments section below.
Make the cookie dough completely
ahead, divide it into three or four portions, then roll each one out
between sheets of baking parchment or wax paper. Check out my All-Purpose Sugar Cookie Dough if you need a tasty, easy-to-handle recipe. (If you’ve got teens on hand, have them help you make the dough or ready it by themselves.)
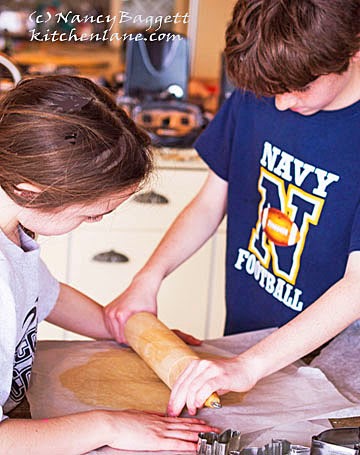
Use the rolling out method shown at right. Rolling between sheets of parchment means that no flour needs to be used; this keeps the dough from becoming dry and over-floured and also minimizes kitchen cleanup. (For my video detailing exactly how to do it, go here.)
Let the sheets of dough chill on a
baking sheet and refrigerate until you need them, then take them out
one by one as needed. Keeping them cool makes cutting out and transferring the cookies to baking sheets very easy. (For my tips on what cutters to use and how to keep dough from sticking to fancy cutters, check my Youtube video here.)
Lay out a sheet of baking parchment or wax paper for each child to work on. This makes cleaning up icing drips easier and also gives them their own personal workspace to use.
Make a generous batch of icing that can
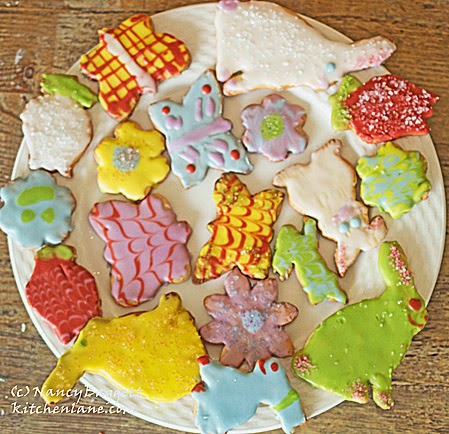
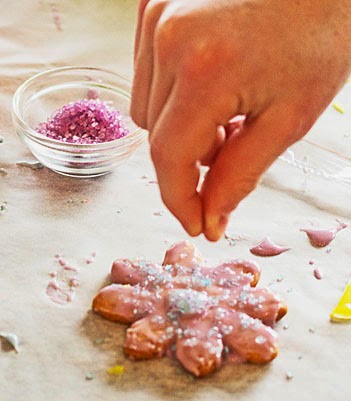
be divided up and tinted various shades; we used the icing recipe below. Yesterday we set out six bowls, added color to five, and then left the sixth one plain white. You can see from the cookies the kids created (in the pic below) that this yields a very pleasing array. If possible, offer decorating sugars in several different colors so the kids can add more easy finishing touches and accents to their works of art.
Have at least one spreading knife and one spoon for each bowl of icing. Otherwise, the children will be temped to
dip the same utensil into different colors and the colors will end up all
mixed together.
School-age children also have enough dexterity to enjoy piping icings: If you don’t have pastry bags and tips, just put icing portions into sturdy mini plastic bags with one tiny bottom corner snipped off.
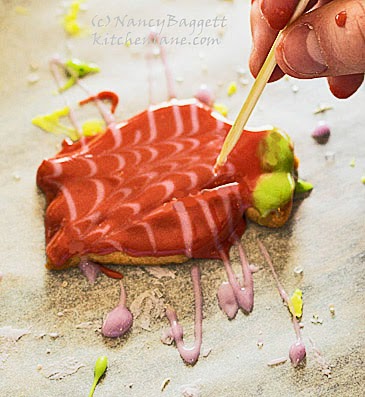
Charlie and Lizzie used piping to add eyes and centers to the bunny and daisy cookies. Charlie also added piped lines of accenting icing over top a base layer in the pic below. Then while both icings were still wet, he drew a tooth pick through the lines to create a design. The technique, called marbling, is one pastry chefs use, but is also one that kids can do and find great fun. The results look quite impressive but don’t take a lot of skill. (The video here shows more marbling ideas.)
 Whenever the kids start fidgeting or
growing tired, simply wrap up while they are still
enjoying themselves. After all, they don’t have to make all the cookies. You can cover and refrigerate the leftover dough and icings and finish up later on.
involved, as little kids need a lot of assistance and supervision.
One last tip–which I always have to remind myself to follow: Let the children decide on their own colors and decorating approach. I might not choose to color a bunny bright green and give it red eyes, or put a happy face on a flower cookie, but for children being fanciful and wildly creative is a big part of the fun.
Quick All-Purpose Powdered Sugar Icing
This provides enough icing to fully decorate 30 to 40 cookies. Halve or double the recipe for a smaller or larger batch.
Notice that the recipe gives the option of incorporating meringue powder or plain egg white powder. This addition is totally optional, but it helps keep the icing colors bright and lets them dry with a smooth, hard finish. (You can find Wilton’s meringue powder with discount department store baking and decorating supplies and egg white powder in some supermarkets.)
The recipe also calls for corn syrup, which should never be left out. It keeps the icing flowing and easy to spread, plus gives it a slight gloss and sheen.
Tip: If using botanically-based dyes, never add any lemon juice or other acidic ingredient to the icing, as its low PH can react with the natural pigments and change the dye colors.
4 cups powdered sugar (sift after measuring if lumpy)
1 tablespoon meringue powder or egg white powder, optional
2 teaspoons light corn syrup
1/2 teaspoon vanilla extract
1/8 teaspoon almond extract, optional
4 to 6 tablespoons water, as needed
Botanical or synthetic food dyes, as desired
In a large bowl or mixer bowl thoroughly stir together the sugar and meringue power (if it is being used). Add the corn syrup, vanilla, and almond extract (if using). Add 3 1/2 tablespoons water. Stir or beat on very low speed until it begins to blend together; scrape down the bowl sides several times. Gradually add in enough more water to yield a completely smooth spreading or piping consistency; for piping the icing should be slightly stiff, for spreading it should be just slightly fluid. Adjust the consistency as needed by thinning with more water or thickening with a little more powdered sugar.
Divide the icing among several bowls, then tint with food colors as desired. Use the icing or cover with plastic wrap and refrigerate for up to a week. Let return to room temperature and stir well before using.
For icings that are tinted with only fruit juice concentrates, as shown at right, go here.


Looks like fun. Thanks for the tips.