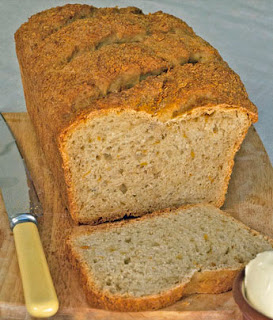
Lots of folks seem to be cranking up their ovens and making homemade bread now. Probably it’s because this is a fine way to warm up the winter kitchen and provide the matchless taste and aroma of a fresh yeast bread loaf at the same time. The picture features my No-Knead Multigrain Harvest Bread, which is great any time of year but has a golden hue that makes it seem even more warming in fall and winter weather.
Recently I’ve heard from a number of people who’ve been using my Kneadlessly Simple cookbook. Some had questions; others had comments or results they wanted to share. (One person said my kneadless method had turned her into an almost daily yeast bread baker! Yay!)
Sarah e-mailed to ask if it is okay to substitute kosher salt for the table salt I call for. It is, just use a teensy bit more of the kosher salt. Also, to ensure its coarser grains dissolve, mix it into a little warm water and stir thoroughly, then add it into the water rather than into the dry ingredients.
Kneadlessly Simple–Available here.
Ralph wanted me to describe the “ideal” consistency of my kneadless doughs when the ingredients are first mixed together: For a dough without seeds, raisins, etc., the consistency should be wet enough to just stir everything together until smooth; the mixture should hold its shape at first, then over a few minutes spread out in the bowl. It should be hard to stir. Doughs with add-ins like seeds that will draw up moisture during the long, slow rise need to be softer and slightly wetter; they will spread out in the bowl right away, but become firmer as the additions hydrate.
My Italian cookbook author colleague and friend, Domenica Marchetti made my day with the following rave review: “The focaccia recipe in Kneadlessly Simple is brilliant. It is the by far the best focaccia I have ever made. The texture is sublime–certainly as good as I’ve had in the best restaurants. …” Thank you, thank you, Domenica! (Whenever I make my focaccia, my hubby and I immediately eat half the batch!)
I was likewise thrilled to hear from Seattle Seedling blogger, Stacy Brewer, who says she uses Kneadlessly Simple “religiously,” and wanted to do a blog post about her favorite from the book, the French Walnut Bread. She mentioned that she was a newbie yeast baker when she began using the book, but now bakes all the time. (Another yay!)
She has since posted wonderfully informative step-by-step pics and details of her walnut bread making, including some images that show exactly what the consistency of the dough should be when ingredients are mixed together. And she provides a timeline so you’ll readily see when the dough needs a few minutes of your attention and when you are free to go off and leave it to bubble away and knead itself. Stacy has also, with permission, posted the Kneadlessly Simple French Walnut Bread recipe here, (it’s shown above right).
Additionally, the folks at Fleischmann’s Yeast have been very supportive and enthusiastic about my “kneadnessly simple” method and asked me if I would create a recipe exclusively for them. I did, and they have given me permission to share it with you here.
My colleague and friend, Domenica Marchetti made my day with the following rave review: “The focaccia recipe in Kneadlessly Simple is brilliant. It is the by far the best focaccia I have ever made. The texture is sublime–certainly as good as I’ve had in the best restaurants. …” Thank you, thank you, Domenica! (Whenever I make my focaccia, my hubby and I immediately eat half the batch!)
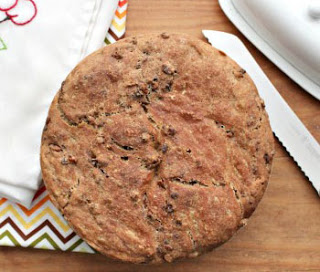
I was likewise thrilled to hear from Seattle Seedling blogger, Stacy Brewer, who says she uses Kneadlessly Simple “religiously,” and wanted to do a blog post about her favorite from the book, the French Walnut Bread. She mentioned that she was a newbie yeast baker when she began using the book, but now bakes all the time. (Another yay!) She has since posted wonderfully informative step-by-step pics and details of her walnut bread making, including some images that show exactly what the consistency of the dough should be when ingredients are mixed together. And she provides a timeline so you’ll readily see when the dough needs a few minutes of your attention and when you are free to go off and leave it to bubble away and knead itself. Stacy has also, with permission, posted the Kneadlessly Simple French Walnut Bread recipe here, (it’s shown above right).
Additionally, the folks at Fleischmann’s Yeast have been very supportive and enthusiastic about my “kneadnessly simple” method and asked me if I would create a recipe exclusively for them. I did, and they have given me permission to share it with you here.
Multigrain Harvest Bread
Fragrant, homespun, and boasting a gentle grain taste and amber-brown crust, this loaf is great for toast, for snacking, or serving in thick slices along with a hearty soup or stew. The tawny, nubby top comes from the addition of finely crushed cornflakes, which along with wheat flour and oats give the bread its unique celebration-of-the-harvest appeal. Although unbleached all-purpose white flour can be used, bread flour will produce a lighter, higher-rising loaf.
Tip: For more whole grain goodness, replace 1 cup of the white bread flour with 1 cup of regular or white whole wheat flour. (White whole wheat flour is a whole grain flour made from a strain of wheat that has a lighter color and flavor than the traditional variety. The King Arthur brand is fairly widely available.)
Tip: To quickly crush the cornflakes, seal them in a sturdy baggie, then press down all over until crumbled into very fine bits. Measure out the 1/2 cup after crushing.
- 3⅔ cups (18.5 ounces) unbleached bread flour or all-purpose white flour, plus more as needed
- ½ cup crushed cornflakes (measure after crushing), divided
- ½ cup old-fashioned or quick-cooking oats (not instant)
- Generous 1½ teaspoons plain table salt
- 1¼ teaspoons Rapidrise, bread machine or instant yeast
- 1¾ cup ice water (stir cold water with a heaping cup of ice cubes, then remove cubes before measuring), plus more ice water if needed
- ¼ cup honey stirred together with 1 tablespoon water
- ⅓ cup corn oil or other flavorless vegetable oil
- First Rise: In a 4-quart or larger bowl thoroughly stir together the white flour, half the crushed cornflakes, the oats, salt, and yeast. (Reserve the remaining cornflakes for garnish.) In a large measuring cup, stir together the water, honey and water and oil until well blended. Vigorously stir the liquid into the dry ingredients until thoroughly blended. The dough should be stiff enough to hold its shape but should not look dry; if necessary, stir in a little more flour or water if needed. Lightly brush or spray the dough top with oil.
- Cover the bowl with plastic wrap. For fullest flavor or convenience, refrigerate the dough for up to 8 hours; this is optional. Set it out at cool room temperature (about 70 degrees F) to rise for 11 to 18 hours; this is required.
- Second Rise: Vigorously stir the dough, scraping down the bowl sides. If it is at all soft, vigorously stir in enough more flour to yield a stiff dough that holds its shape. Generously oil a 9- by 5-inch loaf pan. Sprinkle a scant half of the remaining crushed cornflakes into the pan, tipping it back and forth to coat the surface with the flakes. Turn out, then press the dough evenly into the pan.
- Smooth out the dough surface with well oiled fingertips or a rubber spatula. Sprinkle the remaining cornflakes over the loaf top, pressing down very firmly all over to imbed. With oiled kitchen shears or a sharp oiled knife, cut three or four evenly spaced ¼-inch deep slashes diagonally along the loaf top. Cover the pan with oiled or nonstick spray-coated plastic wrap.
- Let rise using any of these methods: for a 1¼ to 2½ hour regular rise, let stand at warm room temperature; for a 1 hour to 1½ hour accelerated rise, let stand in a turned-off microwave along with 1 cup of boiling hot water; or for an extended rise, refrigerate, covered, up to 48 hours, then set out at room temperature. If the dough nears the plastic wrap remove it, then continue the rise until the dough is ½ inch above the pan rim.
- Baking Preliminaries: Fifteen minutes before baking time, place a rack in the middle of the oven; preheat to 375 degrees F.
- Baking: Bake (middle rack) for 25 to 30 minutes until the top is nicely browned. Cover with foil and continue baking about 25 to 30 minutes longer, until a skewer inserted in the thickest part comes out with just a few particles clinging to the bottom. Bake 5 minutes more (or to 206-209 degrees F) on an instant read thermometer) to be sure the center is done.
- Transfer the pan to a cooling rack until cooled to warm. Completely cool the loaf on a rack before packing for storage.
- Serving and Storing: Serve warm, toasted, or at room temperature. Store airtight in plastic at room temperature for 2 to 3 days, or freeze, airtight, for up to 1 month.
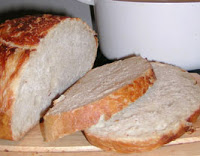 If no-knead strikes your fancy but a plain white boule is more your speed, check out my “kneadless” crusty white loaf here.
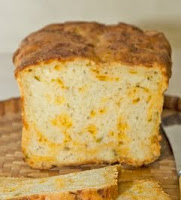 Or perhaps you’d like the Cheddar & Chiles loaf here.

Thanks Holly, delighted to hear that you're enjoying the book. I'll check out your blog today.
Can't wait to try this recipe too. Thanks! I featured your Granola Breakfast Bread on my blog today. I am enjoying your book and thank you for sharing your approach to baking breads.
http://www.abakershouse.com/2012/03/great-granola-breakfast-bread-from.html
from Holly at http://www.abakershouse.com
looks good, I'm going to try it.
Honest, the cornflakes work! They add nice flavor and the slightly golden cast to the color of the bread. Putting the recipe in your book is a great idea, as this is really not like anything that is in the book–it's another option entirely!
Not sure about using cornflakes, but I'll take your word on it. Will need to buy the cornflakes before I can make the bread.
It looks really good.
Printing it and will put in my Kneadlessly Simple bread book.